What is the Smart Coding Tool?
The Smart Coding Tool is designed for working with coded text segments and is very well suited to performing the following tasks:
- Getting an overview of the contents coded with a code,
- Reviewing and, if necessary, changing relevant codes,
- Customizing your code system, particularly differentiating (i.e. breaking down) parent codes or merging codes.
How to use the Smart Coding Tool
To open the Smart Coding Tool for all coded segments of a project, navigate to the Codes menu tab and click on the Smart Coding Tool icon.

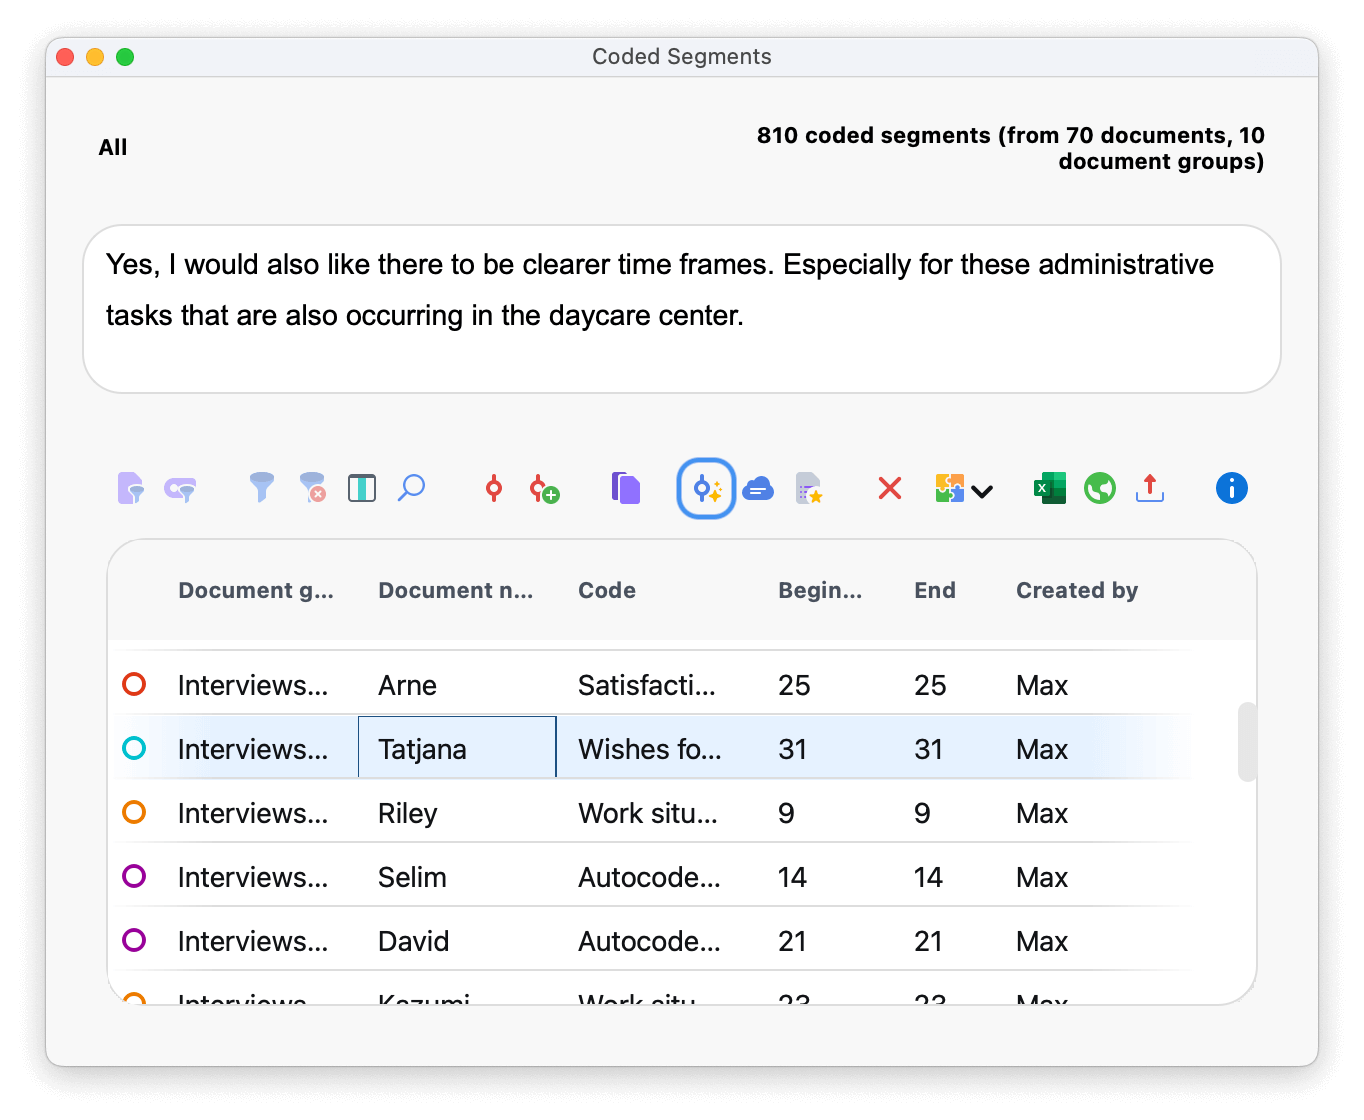
The Smart Coding Tool can also be opened for a compiled list of coded segments by clicking on the ![]() Smart Coding Toolicon.
Smart Coding Toolicon.
- in the “Retrieved Segments” window or
- in the tabular “Overview of Coded Segments“.

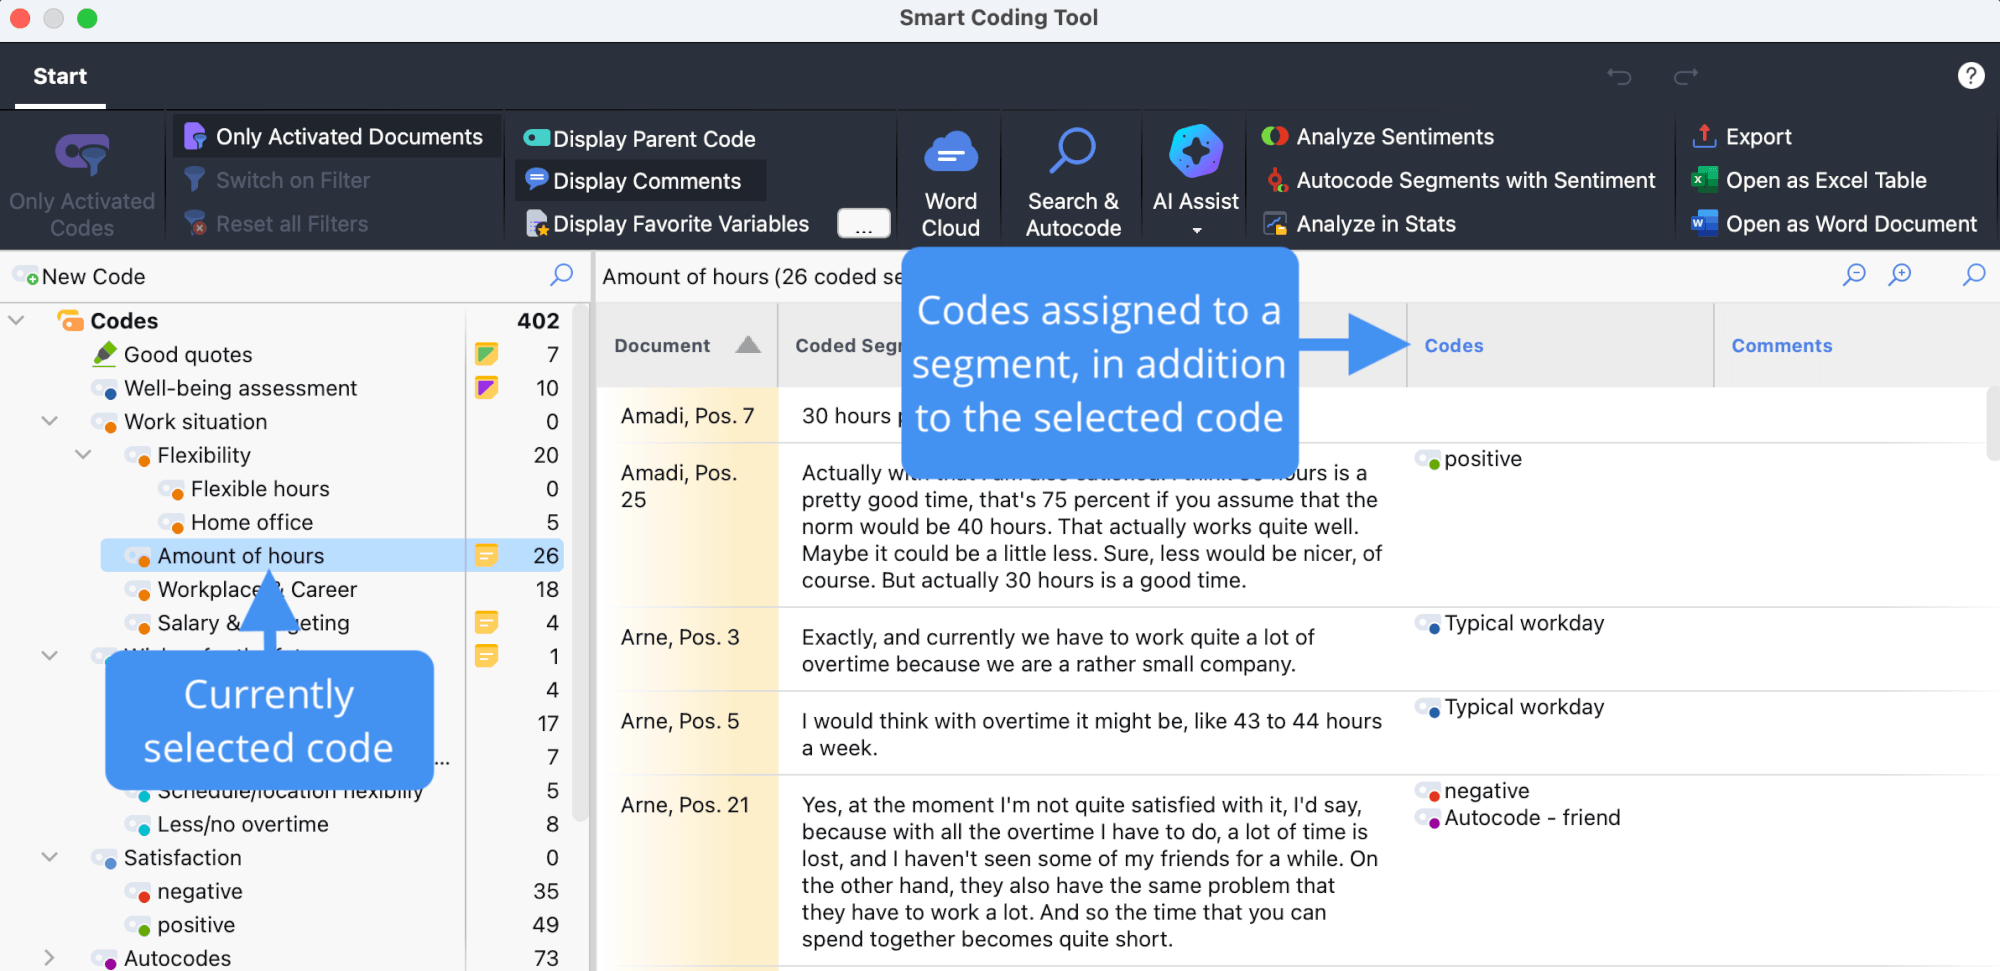
The Smart Coding Tool environment looks like this:

The window is divided into two display areas. The code system is displayed in the left area. Here, you can select a code to display its coded segments in a table in the right area. The selected code is highlighted in the code system tree and is displayed above the table. Here, MAXQDA also displays how many coded segments (from how many documents) are displayed in the table, that is, how many rows the table contains.
The individual columns in the table contain the following information:
Document – The source document from which the coded segment originates.
Coded segments – The coded segments of text, images, and PDFs.
Codes – The list of codes assigned in the area of the displayed coded segment. It doesn't matter whether the code has only been assigned to one character of the segment, the entire segment, or even beyond the boundaries of the segment. Only the codes that are visible on the left in the code system are listed. The selected code in the code system tree and the direct parent code of this code are never listed in this column to avoid redundant information.
Comments – A text field that can be freely edited (max. 511 characters) to add comments to coded segments.
Like all MAXQDA table widows, the individual areas can be adjusted: the columns can be adjusted in width and position with the mouse or hidden with a right-click on a column heading. A click on the heading sorts the column in ascending order, another click in descending order.
- You can interact with other MAXQDA functions while the Smart Coding Tool is open, allowing for a more flexible and efficient workflow.
- When starting the Smart Coding Tool from the "Retrieved Segments" window, the weight filter is ignored. Therefore, if segments were not displayed in the "Retrieved Segments" window due to the weight filter, they will still appear in the Smart Coding Tool.
Options in the ribbon menu
The following options in the ribbon menu allow you to adjust the view:
Only Activated Codes – restricts the display of the code system to the activated codes only. This option is selected automatically when you open the Smart Coding Tool from the “Overview of Coded Segments“ or the “Retrieved Segments“ window. When turned off, all your codes and subcodes are displayed.
Only Activated Documents – restricts the display of coded segments to those in currently activated documents. The display of frequencies in the code tree is adjusted accordingly.
Filter – applies the filters you can define by right-clicking on the column heading in the right pane and selecting Set Filter.
Reset all Filters – removes all filters from all columns.
Display Parent Code – in addition to the code, the “Codes“ column also displays its parent code.
Display Comments – displays the “Comments“ column.
Display Favorite Variables – shows additional columns for each favorite variable. For example, you can display the age of a person or other background information about a case. You can set favorite variables by clicking on the button with the three dots.
At the top right of the window there are two icons for the local undo function:
Undo – undoes the last action in the Smart Coding Tool.
Redo – redoes the last action in the Smart Coding Tool.
Create new code
You can always add new codes to use to code selected segments: Click on the green plus symbol that appears while hovering over an existing code or click on the icon New Code at the top left:

Newly created codes are automatically activated so that these are displayed in the code system if option Only Activated Codes is switched on.
Assign a code
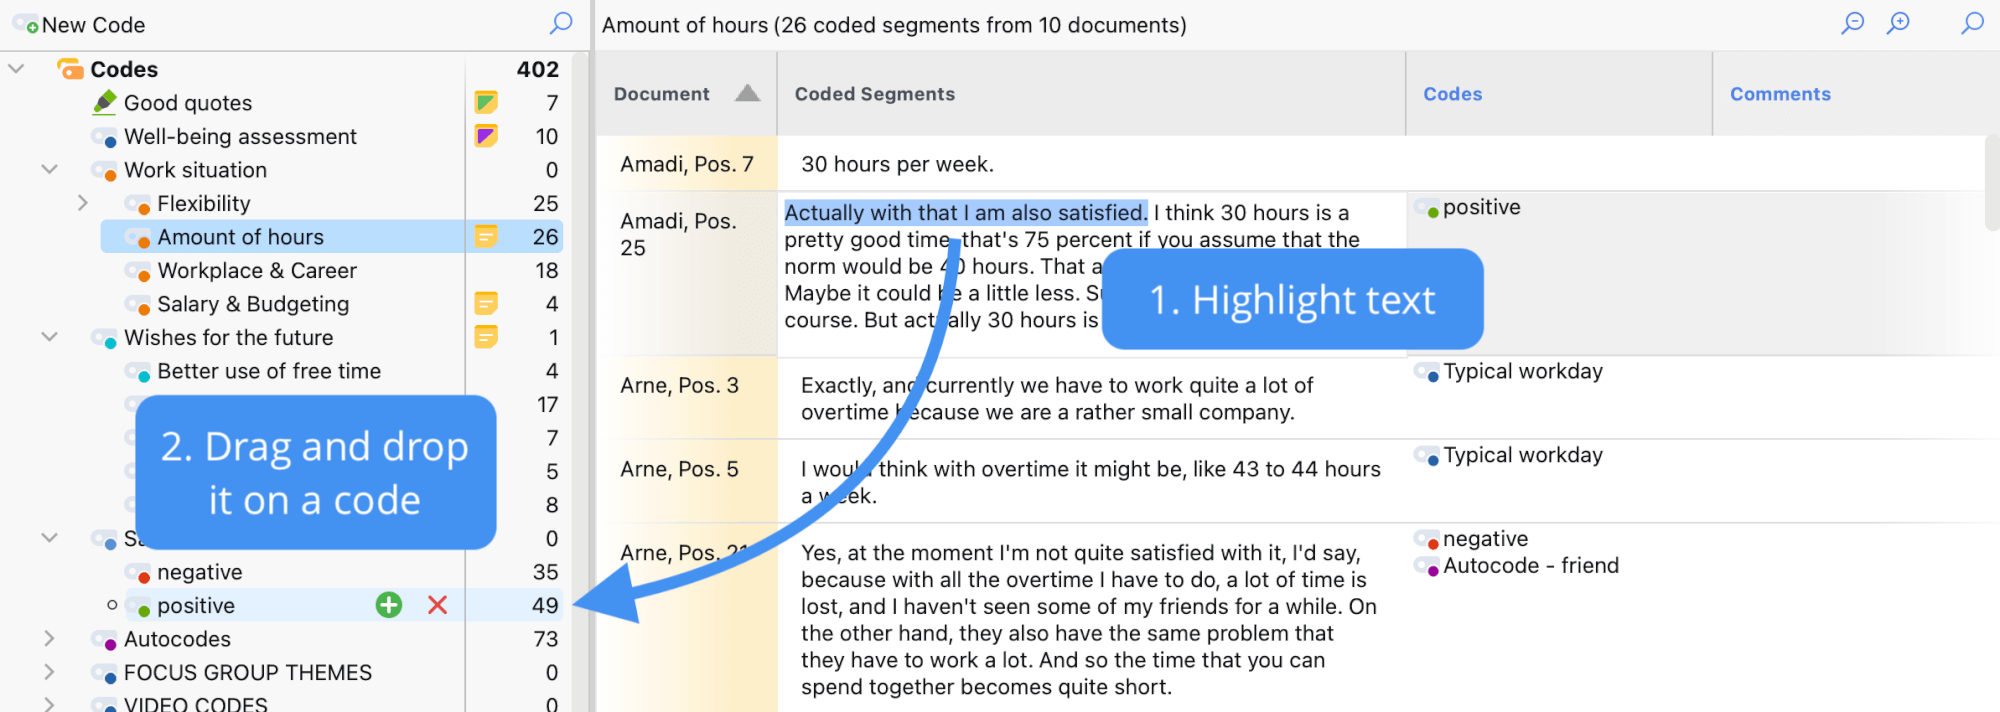
To assign a code to a coded segment, click and drag the line of the code to one of the displayed codes in the code system. The newly assigned code is then immediately displayed in the “Codes“ column. To code only part of a coded segment, first double-click on the whole coded segment text, then select the portion of text you want to code, and drag it to one of the codes in the code system. Even if you assign the same code to several sections of a coded segment's text, the code name will only be listed once in the "Codes" column.
If you hold down the Ctrl key (Windows) or ⌘ key (macOS) while dragging-and-dropping a whole line with a coded segment onto a code, the complete coded segment is moved to the selected code. It will thus no longer be displayed in the table.

Code with code favorites
You can use your Code Favorites list to code segments with a subset of your codes quickly. Click the
To favorite a code, drag and drop it from the code tree onto the Code Favorites window.
Search and autocode coded segments
You can search the text segments in the Smart Coding tool for terms and have the results automatically coded with a code.
Perform a local search
To perform a local search in the segments currently displayed in the right window:
- Click on the magnifying glass in the header of the table at the top right, or use the shortcut Ctrl+F (Win) or ⌘+F (macOS) to show the search bar.
- Enter a search term.
- Click on the filter icon in the search bar to display only the answers with hits (this step is not mandatory for autocoding, but it is very helpful for a quick overview of the segments containing the search hit).
Perform complex searches
The local search bar provides only limited search functionality and is limited to the segments currently listed in the right pane. If you want to perform more complex searches, click Search and Autocode in the ribbon menu.
This opens the MAXQDA “Text search” window.
In the window, several search items can be entered that must appear all in a coded segment; in the example, a search is performed for the words “happiness” AND “psychology” within the same response. The search for two or more search items using the AND search can also be limited to paragraphs or sentences.
The options for the search correspond to those of the text search and are described there in detail. In addition, there is the option Only in listed segments, which ensures that only the segments currently listed in the right-hand window are searched. If you switch off the option, MAXQDA will search all answers that are currently available in the working environment (the number of available segments is shown in the first line of the code tree in the left pane).
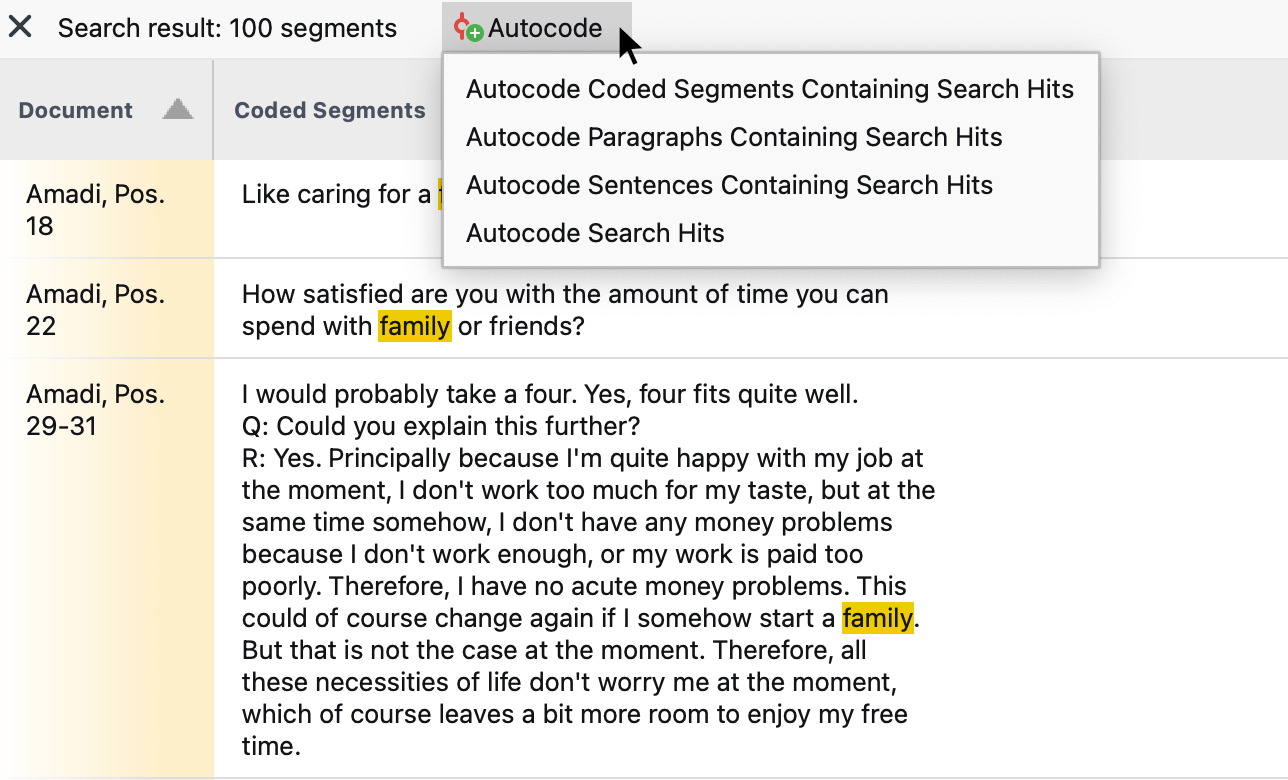
After clicking Search, the segments with hits are listed in the right pane of the window:

Autocode search results
To automatically code the segments with a new code, click on the icon of the same name as shown in the previous figure. A menu appears where you can set the context for autocoding:
- All coded segments containing the search hit
- All paragraphs containing the search hit
- All sentences containing the search hit
- The highlighted search hits only
After selecting the context to be coded, a dialog box for creating a new code appears. After clicking OK, the code is assigned to the selected context. The code name can be adjusted at any time in the code system on the left.
Remove assigned codes
To remove an assigned code, click the "X" that appears when you move the mouse over a code in the "Codes" column. All assigned codes are then removed from the coded segment.

Customize your code system
Your code system can be customized throughout the entire analysis process. You can change the order of codes with the mouse and even insert them as sub-subcodes. By right-clicking on a code, all the functions from the overall "Code System" are available to customize your code system in this window:
- Delete code
- Sort subcodes (alphabetically or by category frequency)
- Change code color
- Create or edit code memo
Click a code in the code system to list all the segments coded with this code. This way you always have an overview of the contents of your categories. The selected code in the code system is highlighted. The name of the selected code is also displayed above the listed segments.

Moving or copying individual coded segments
By default, if you drag a coded segment onto a code, that code will be assigned to the segment in addition to other previous codes assigned to it. The segment will still be coded with the code whose other segments are displayed in the right window.
If you hold down the Ctrl key (Windows) or ⌘ key (macOS), however, while dragging a coded segment to a code, the code will be replaced. That is, the code whose segments are currently listed in the right window is removed and the segment you dragged to a different code disappears from that list.
This function is especially useful if you want to transfer a coded segment from one subcode to another subcode, because the latter suits better in terms of content.
Moving or copying all coded segments of one code to another
To move or copy all segments of a code to another code, right-click on a code and select the function Move Coded Segments or Copy Coded Segments in the context menu.
Then right-click on the target code and select the corresponding function: Paste Coded Segments (from ‘Code xy‘). For more information on this feature, refer to the section Move or copy all coded segments of a code.
Working with comments on coded segment
In the “Comments“ column, you can write a coding comment on each coded segment. For example, you can add notes about the coded segment texts, ideas for new categories, and more. Comments are also suitable for keeping track of your analytical procedure (i.e. "still unclear“ – "come back to this again later") or to store information for other team members ("please cross-check this!").
To show the “Comments“ column, click on the Display Comments option in the menu tab. Double-click on a cell in the "Comments" column to enter a new comment or edit an existing one.
AI Assist: Summarize coded segments (into single comments)
Using AI Assist, you can automatically summarize the contents of a coded text segment:
- To summarize one listed text segment, right-click on it and choose AI Assist: Summarize Segment (into Comment).
- To summarize all listed text segments at once, click on the icon AI Assist in the ribbon menu and choose Summarize Listed Text Segments (into Comments).
The summaries are saved as comments on the coded segments and are displayed in the "Comments" column. Please refer to AI Assist: Coded Segment for details about the summarization process.
AI Assist: Summarize coded segments (into one Code Summary)
You can also automatically summarize all currently listed coded segments and save the result in the code memo: Click on the AI Assist icon in the ribbon menu and choose Summarize Listed Text Segmenst (into Code Summary).
Please refer to AI Assist: Code Summary for more information on the summarization process.
AI Assist: AI Chat with Coded Segments
You can also interactively communicate with already coded textual data by using AI Assist's Chat function. Navigate to the AI Assist icon in the ribbon menu and choose Chat with These segments. Alternatively, right-click on a code and choose AI Assist > Chat with this Code's Coded Segments from the context menu.
For more information, please refer to AI Chat with Coded Segments.
Analyze Sentiments
With MAXQDA you can perform a sentiment analysis in the Smart Coding Tool. This automatically evaluates wether the content is to be assessed as negative, neutral, or positive. You can read more about the sentiment analysis in MAXQDA in the chapter Analyze Sentiments of Tweets.
Export your display
Your current display can be exported via the usual icons at the top right in the menu bar. All coded segments currently listed are exported.
