
The Codeline is a case-based visualization tool that displays the sequence of coded segments in a document. It supports text, PDF, and table documents. If you have coded audio or video files directly in the Media Player, you can also display the Codeline for the media file. The visualization resembles a musical score: columns represent the document's paragraphs in sequence, while rows represent codes. A colored cell shows that a code has been assigned to the corresponding paragraph.
The simplified example below shows a document with 12 paragraphs and three codes. To read it, follow a row to see where in the document a code appears, or follow a column to see which codes occur together in a paragraph. In paragraph 5, for example, both Code2 and Code3 appear. The Codeline gives you a quick overview of how codes are distributed throughout a document. For example, you can identify which codes appear during different phases of an interview and where they co-occur.
| Paragraph | ||||||||||||
| 1 | 2 | 3 | 4 | 5 | 6 | 7 | 8 | 9 | 10 | 11 | 12 | |
| Code1 | ■ | ■ | ■ | |||||||||
| Code2 | ■ | ■ | ■ | ■ | ■ | |||||||
| Code3 | ■ | ■ | ■ | ■ | ||||||||
When to use the Codeline
You can use the Codeline to:
- get an overview of the coding throughout a document.
- explore coding patterns by following a particular code to see where it appears and which other codes appear nearby.
- compare two or more codes over the course of an interview by displaying only the selected codes.
- analyze focus groups to see at a glance which speakers respond to each other and which topics are associated with each speaker.
Opening the Codeline
You can open the Codeline in either of the following ways:
- In the main ribbon menu, select Visual Tools > Codeline.
- Right-click a text, table, or PDF document in the documents window and select Codeline.
To open the Codeline for an audio or video file, open it for the text document that MAXQDA creates automatically when you import the media file, and enable Codeline for linked media file.
Setting up the Codeline
When you open the Codeline, MAXQDA offers the following options:
Only for activated codes: Includes only codes that you have activated in the codes window. If you have activated a subcode, its parent codes are also included in the visualization.
Aggregate on the 1st level: Displays only top-level (parent) codes. MAXQDA treats all subcodes as instances of their respective parent codes.
Use weight filter: Select this option and confirm your selection to open another dialog where you can specify a coding weight range. The Codeline then displays only segments whose coding weights fall within this range.
Reading the Codeline
Unlike the Document Portrait, the Codeline does not require you to assign meaningful colors to your codes. It displays the assigned code colors, but if you have not selected any colors, it uses green symbols instead. The Codeline shows where different codes appear in a document, so you can interpret the visualization even without color differentiation.
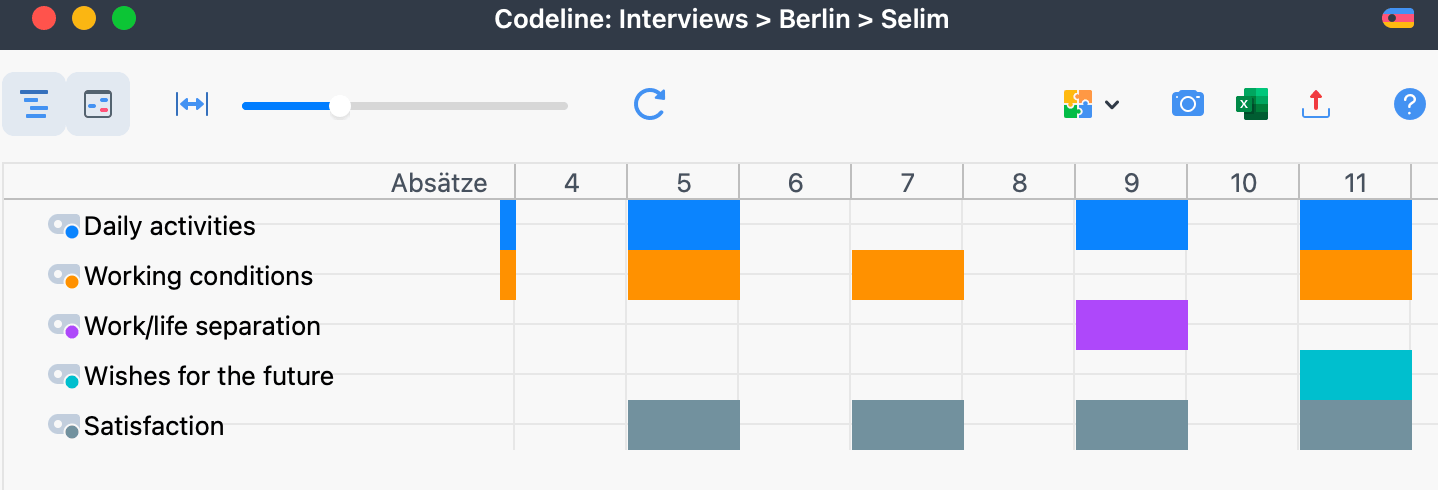
What does the Codeline display?
- For text documents, the Codeline creates a table of codes and paragraphs.
- The paragraphs appear along the horizontal (X) axis, starting with the first paragraph. Each paragraph has its own column, so the number of columns matches the number of paragraphs in the text.
- When a code has been assigned to a segment within a paragraph, a rectangle in the corresponding code color appears in that column. If the same code has been assigned to consecutive paragraphs, the rectangles form a continuous bar.
- When you collapse a parent code, MAXQDA combines its subcodes under the parent code and displays them in the parent's color.
The Codeline is available for text, PDF, and table documents, but not for images. The units represented by the columns depend on the document type:
| Text | Paragraphs Lines, if line numbering is enabled for the text in the Document Browser |
| Table | Rows |
| Pages | |
| Linked audio or video file | Seconds or minutes for files up to 10 minutes long Minutes for files longer than 10 minutes |
Adjusting the display
The Codeline toolbar provides several display options:
 Codeline for linked media file: This option is available when you open the Codeline for a text document with a linked audio or video file. MAXQDA creates this text document when you import the media file, even if you have not transcribed it. If you have coded only the media file, enable this option. The columns then represent seconds or minutes rather than paragraphs.
 Display codes with hierarchy: When enabled, this option displays codes in the hierarchical structure of the code system. If you selected Only for activated codes when setting up the Codeline, MAXQDA also includes non-activated parent codes to preserve the hierarchy. When disabled, all codes appear at the same level. This option is not available if you selected Aggregate on the 1st level when setting up the Codeline.
 Standardize unit width and color unit completely: When enabled, this option displays all paragraphs (or lines) of a text document at the same width, regardless of their length. It also fills the entire width of each paragraph with the code color, regardless of how much of the paragraph has been coded.
When disabled, the Codeline takes the number of characters assigned to each code into account and colors only the corresponding passages. The column headings still show paragraph numbers, but each column's width is proportional to the number of characters in that paragraph. Longer paragraphs therefore have wider columns than shorter ones.
For other document types, enabling this option has the following effects:
- For tables, all rows have the same width. If a row contains a coded segment, the Codeline displays the entire row as coded with that code.
- For PDF documents, all pages have the same width. If a page contains a coded segment, the Codeline displays the entire page as coded with that code.
- For linked audio and video files, the units (seconds or minutes) are already standardized, so their widths do not change. However, if a unit contains a coded segment, the Codeline displays the entire second or minute as coded with that code.
 Unit (seconds or minutes): This icon is available when Codeline for linked media file is enabled. By default, the Codeline displays seconds. Click the icon to switch the columns to minutes, and click it again to switch back to seconds. Files longer than 10 minutes are displayed in minutes.
 Fit to window width: Fits the entire Codeline within the available window width. This is particularly useful when you want to include the full visualization in a publication with limited space, such as a single page. The proportions of the coded segments remain unchanged, except for very short segments, which appear as thin vertical lines to ensure they remain visible.
Use the slider in the toolbar to adjust the column width.
 Refresh: Refreshes the Codeline display by running the function again.
Interacting with source files
The Codeline is interactive. Hover over a symbol to display a tooltip showing the code or subcode name and its position. Double-click a symbol to highlight the corresponding segment(s) in the Document Browser or Media Player.
Saving the view in Questions – Themes – Theories
In the Questions – Themes – Theories window, you can collect and comment on important results from your project. Click the  Send to QTT Worksheet icon to save the current view to a new or existing worksheet.
Exporting the Codeline
The toolbar provides two icons for exporting the Codeline:
 Copy current display as an image to clipboard: Copies the current view to the clipboard. You can then paste it into a report or presentation using Ctrl+V (Windows) or ⌘+V (macOS).
 Export: Exports the entire Codeline as an image file.
