In MAXQDA, you can search for information in your documents in a variety of ways. One method is to search for particular words or character strings with the lexical search function. You may be familiar with this search method from text-processing programs. The principle is basically the same in MAXQDA, with the advantage that you can search many documents simultaneously for the words. A lexical text search finds only those terms that actually appear in the text. Searching with theoretical concepts and subject categories, such as “Helper Syndrome” in a study of volunteers in social work, will naturally not provide any results.
By assigning codes to appropriate document segments, you be able to find segments that relate to a certain theme. This finding of coded segments, also known as retrieval, requires only that you have created codes and assigned them to those document segments. After you have assigned codes to the document segments, you will be able to call up all segments that were coded with the same code. MAXQDA offers various ways to do this retrieval, but it is all based on activation of documents and codes.
The following explanation applies not only to texts, but also to coded segments in images, PDF files, table documents, audio and video files.
The retrieval principle in MAXQDA is very simple:
Activating documents
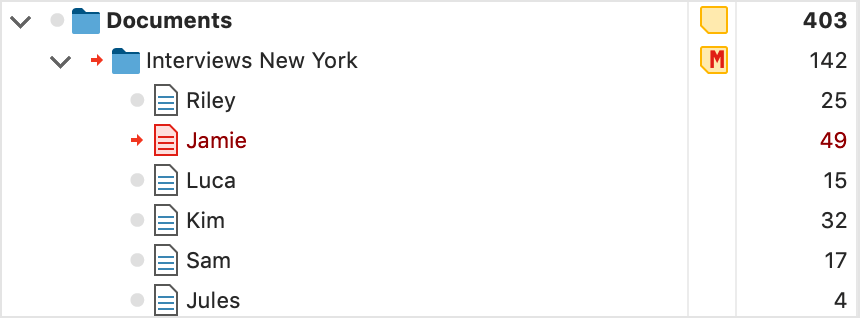
First the documents: All documents and document groups are listed in the “Document System”. The starting point, then, is an inactivated document. The current state of the activation can be recognized by the color of the document name and the document symbol: Activated documents are displayed in red and the grey circle in front of them changes to a red arrow.


As soon as at least one document is activated in a document group, a red arrow will also appear in front of the document group symbol:
1. Activation with the mouse
The easiest way to activate a document is with the mouse: Click with the left mouse button on the symbol of a document to activate it. Alternatively, documents can be activated by clicking on the grey circle in front of the document symbol or on the displayed number of coded segments at the end of the row.
All documents in a document group or document set can be activated in the same way: To do this, click on the folder icon of the document group or document set. All the documents in the project can also be activated with a single click by clicking on the folder symbol of the "Documents" entry at the top of the "Document System".

2. Activation via the context menu
You can also activate a document via the context menu: Right-click the document name or icon and choose Activate from the context menu.
In the same way, you can also activate all documents of a document group or document set at the same time by right-clicking the group or set and selecting Activate all documents. This menu entry is also available at the very top level, "Documents", the root of the Document System.
3. Activation with the Ctrl or cmd Key
Similar to selecting files in Windows Explorer or Mac Finder, you can also hold down the Ctrl key (Windows) or cmd key (Mac) and click on the required document, document group or document set with the left mouse key.
Activating codes
Activating codes works in the same way as for documents. Either right-click on a code and click Activate in the context menu or click on the all symbols of the codes you want to activate.

The activation of the codes is also indicated by a red arrow and the red colour of the code name.
The status bar at the bottom of the MAXQDA window gives you information about the number of activated documents, activated codes, and the number of document segments that are being called up based on those activations.

Compiling coded segments in the "Retrieved Segments" window
All of the document segments that were found based on your activations are called retrieved segments or coded segments and are displayed in the “Retrieved Segments” window - if it is currently open.
 based on activated documents and codes")
Example
Let’s say that you wanted to know what certain interviewees (e.g. Riley, Kim, and Sam) said about other people in their lives. You would start by activating the appropriate documents in the “Document System:”
- Hold the Ctrl key
- Left-click on the document “Riley”
- Left-click on the document “Kim”
- Left-click on the document “Sam”
- Next, you will need to activate the appropriate code along with its subcodes. In this case, the code is called “People”.
- You can now see some basic information about your activations in the status bar. It shows that you have activated three documents and five codes (this includes the four subcodes of “People”). You can also see that 27 document segments were retrieved based on those activations:

More activation methods
Activation via search in document and code names
Both in the "Document System" and in the "Code System" a local search for document and code names can be performed. If you click on the magnifying glass in the window title of the "Code System", the following search bar appears:

By clicking on the red symbol Activate codes with search hits (far right) all codes are activated in the example where the searched word occurs. This process overwrites the previous activation status.
Activating by variables
Activating documents and codes can done manually, but also automatically depending on certain variable values. This type of activation is referred to in MAXQDA as Logical Activation or Activation via Document and Code Variables, and is described in detail here.
Activating by color
Documents and codes can be activated not only manually (by clicking them) and automatically (by document and code variables), but also by color. In both the "Document System" and "Code System" windows you will find the Activate by Color entry in the context menu that appears when you click on the top entry of the hierarchical "tree", More... > Activate Documents/Codes by Color.
After clicking on this button, a dialog field will appear with all the colors that have been used for documents/codes so far. You can then check the box next to the colors to be activated. The two radio buttons at the top also let you check or uncheck all of the colors with a single click.

Activate documents by random
In addition to activation with variables and colors, documents can also be randomly selected. Right-click on the root of the documents and choose More... > Activate Documents by Random.
In the dialog that appears, MAXQDA displays how many documents are available in the project and allows you to enter a number of documents to be activated.
Activation of documents depending on code distribution
To activate all documents in which a selected code exists at least once, right-click the code in the code system and choose Activate Documents with this Code from the context menu. The current activation in the "Document System" will then be overwritten.
Resetting activations
Cancelling the activation of documents or codes operates on the same principle as activation: either via the context menu or with the mouse (eventually using the Ctrl or cmd key.) When you want to start a new Coding Query, but already have documents and codes activated from a previous retrieval, the easiest way to proceed is to automatically deactivate all of those documents and codes.
In the Analysis tab, you will find a Reset activations button, which fulfills this function.

If you want to reset activations for only the documents or only the codes, you can do so with the button available in the “Document System” or “Code System” toolbars.


It is also possible to deactivate all codes or documents by right-clicking on the Documents icon in the “Document System” or the Codes icon in the “Code System” and selecting Deactivate all documents or Deactivate all, respectively.