Printing a map
Any map created in the MAXMaps module can be printed in high quality. To start the print procedure, click the Print icon at the top right of the MAXMaps window.
Adding maps to the "Document System" as new image documents
You can add a map as a new image document to the "Document System" at any time, which allows you to analyze it further as an image. To do this, right-click on the name of the map in your "List of Maps" and select Insert as Document.
Once you have added the map to your "Document System" you can analyze the map like any image in MAXQDA, e.g. you can code parts of the image and add memos.
Copying maps to the clipboard
You can copy the current display of your map to the clipboard at any time, from where you can then paste it into a report, presentation, or graphics program. In the Start tab, click the Copy to clipboard icon.

Exporting a map as a graphic file
Maps can be exported in different formats. Thus, you can use them with other software programs, such as Microsoft Word or PowerPoint. To start the export procedure, click the Export Map icon in the Start tab.

The following file formats are available: SVG, JPG, PNG and EMF for windows.
How to export and import a map
All maps are stored in the MAXQDA project file (MX20 file) along with the rest of the files. Maps can be transferred from one MAXQDA project to another project:
- Right-click a map in the "List of Maps" and select Export map.
- In the export dialog that appears, set the File format to "MAXMaps file (*.mod)"
- Assign a file name and location for the exported file created with the extension MOD.
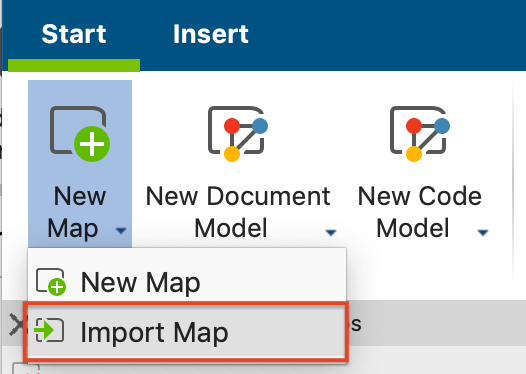
- In the target project, which can also be on another computer, open MAXMaps, click on New Map (not on the symbol) in the Start tab so that the associated menu opens and there you select the Import Map entry.

The connection between MAXQDA objects (such as codes and documents) on a map and the MAXQDA project will, of course, be lost when importing a map. This is because completely different codes and documents can exist in the target project.
Exporting and importing images
All images that you insert into a map or use as a symbol, are not stored in the MAXQDA project, but instead in the MAXQDA folder for external files. This also applies to coded image segments that have been inserted as symbols. If you have imported images into a map, MAXQDA will additionally create a compressed ZIP file with the images used when exporting the map as a MOD file in the same folder.
If you want to open the map on a different computer, you have to extract the images from the ZIP file in the MAXQDA folder for external files on that computer. MAXQDA does this work for you:
- Open any MAXQDA project then, in the Home tab, click on External Files and select Unpack Bundled Data Files from the menu that appears.
- In the file dialog window, select the ZIP file created on the other computer. MAXQDA then unpacks all the files from the ZIP file to the external files folder.
