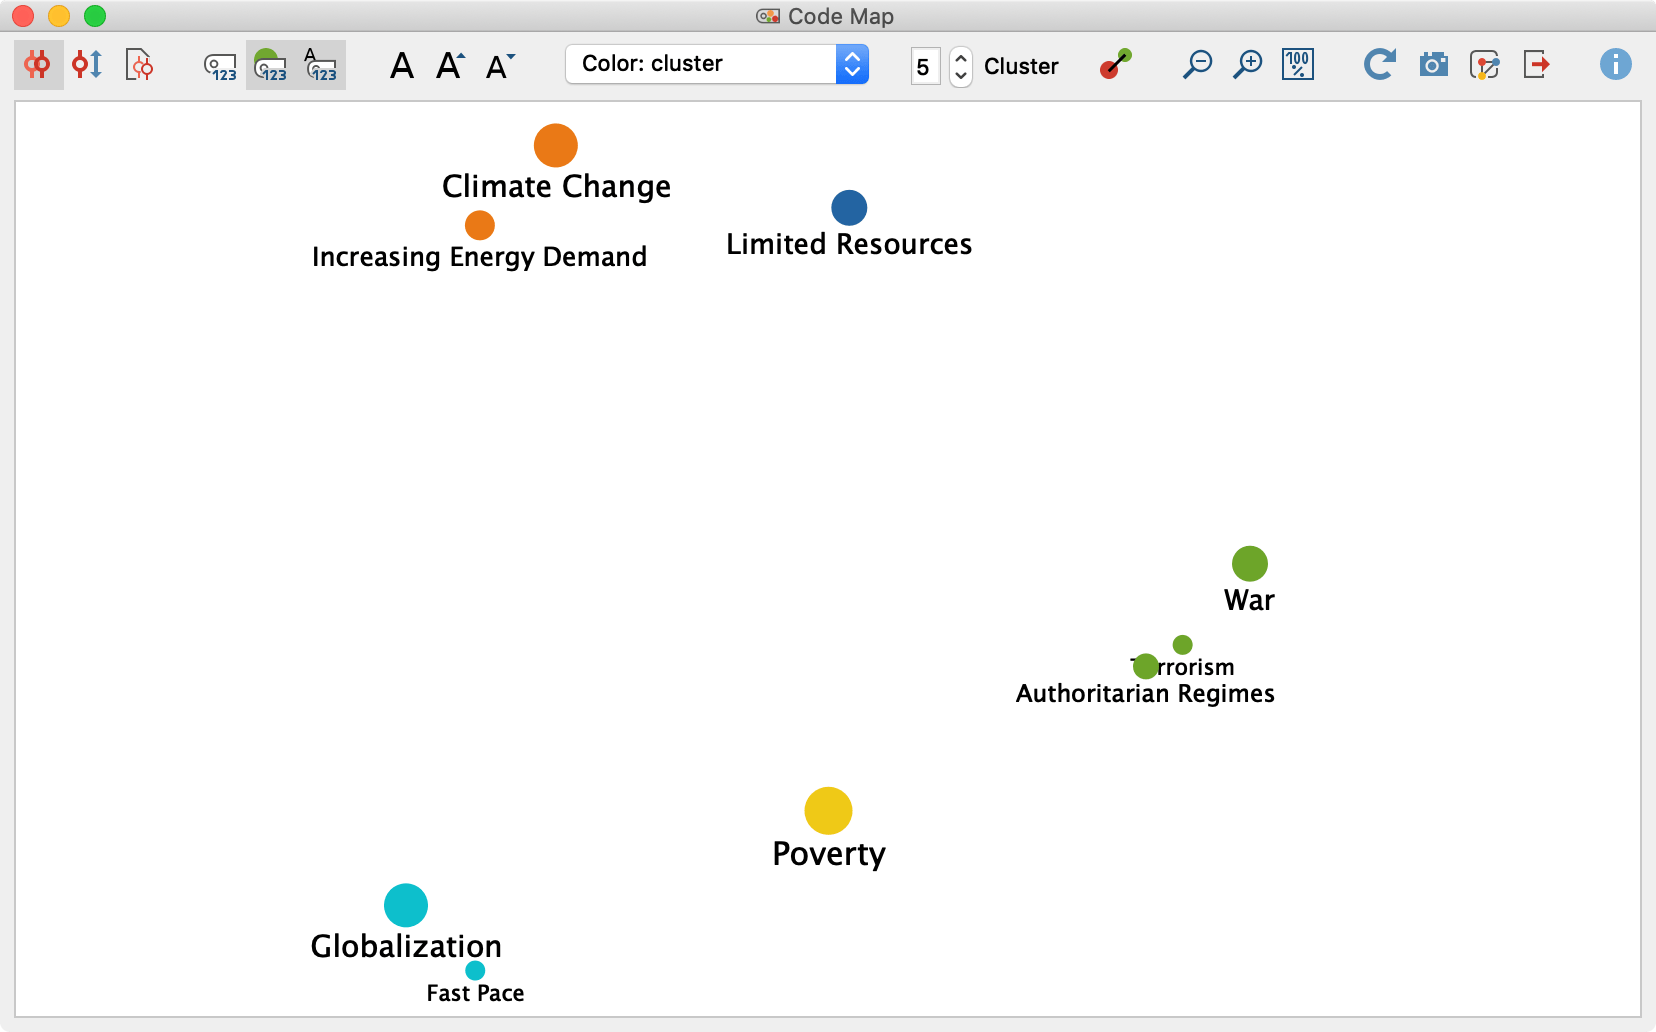
In the code map, selected codes are displayed as on a map. The more two codes overlap, i.e. the more similar they are in terms of their use in the data, the closer they are placed together on the map.

Creating a code map
To create a code map, follow these steps:
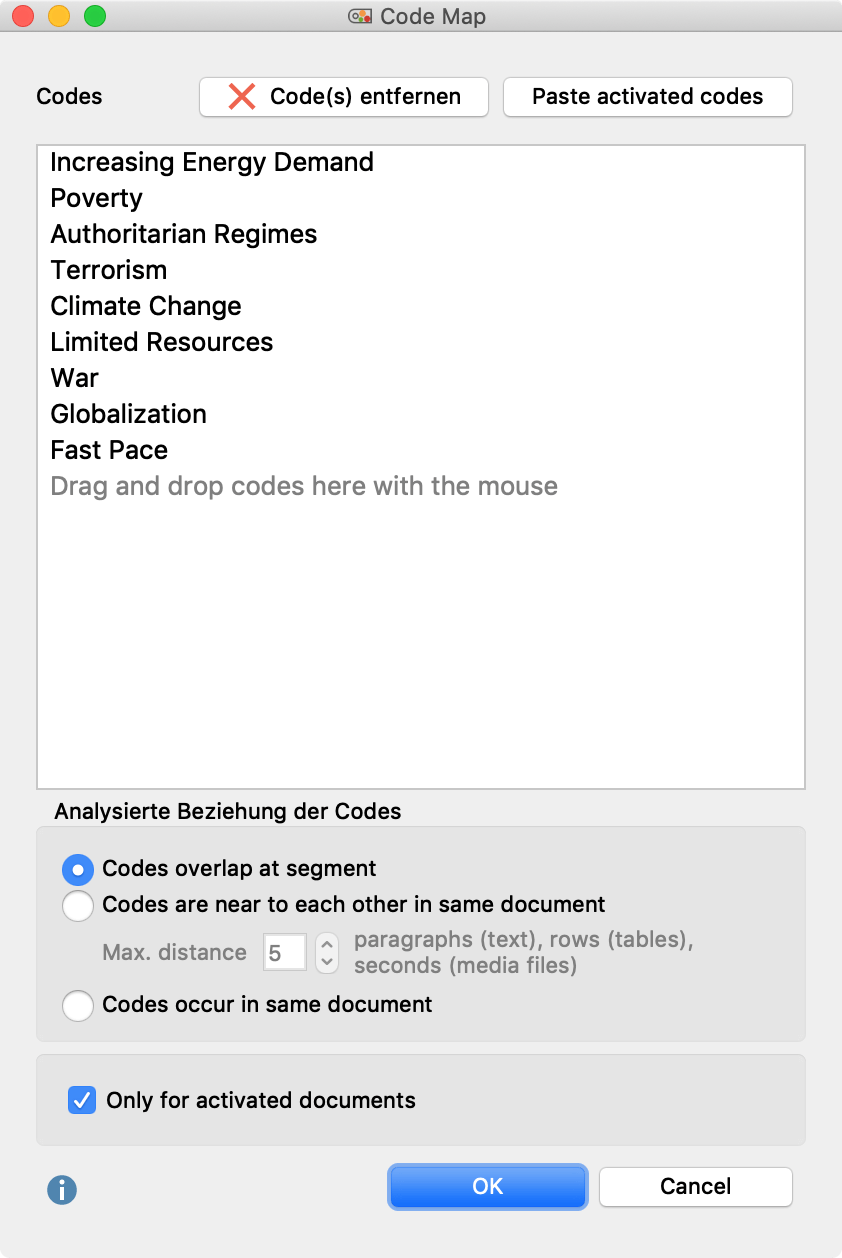
- Select Visual Tools > Code Map in the ribbon menu. The following dialog box will then appear:

- Use your mouse to drag all the codes from the "Code System" that you want to place on the code map into the upper area of the dialog box. You can also activate codes and transfer them directly to the dialog box via the Insert activated codes button.
Select one of the following three options, which determine what aspect should be analyzed to determine the similarity between two codes:
Intersection of codes in a segment – Counts the number of times two codes have been assigned to a segment together. Intersecting codes are sufficient; they do not have to cover 100% of the same area.
Proximity of codes in same document – Counts the number of times two codes were assigned at a definable distance in the same document or in the same media file. You can also enter the maximum distance in relevant number dial.
Code occurrence in same document – Counts the number of documents in which two codes occur. The location of the two codes is irrelevant; they must both have been assigned at least once in the document. - If necessary, restrict your analysis to currently activated documents only.
Click on OK and MAXQDA will open an accordingly generated code map:

What does a code map display?
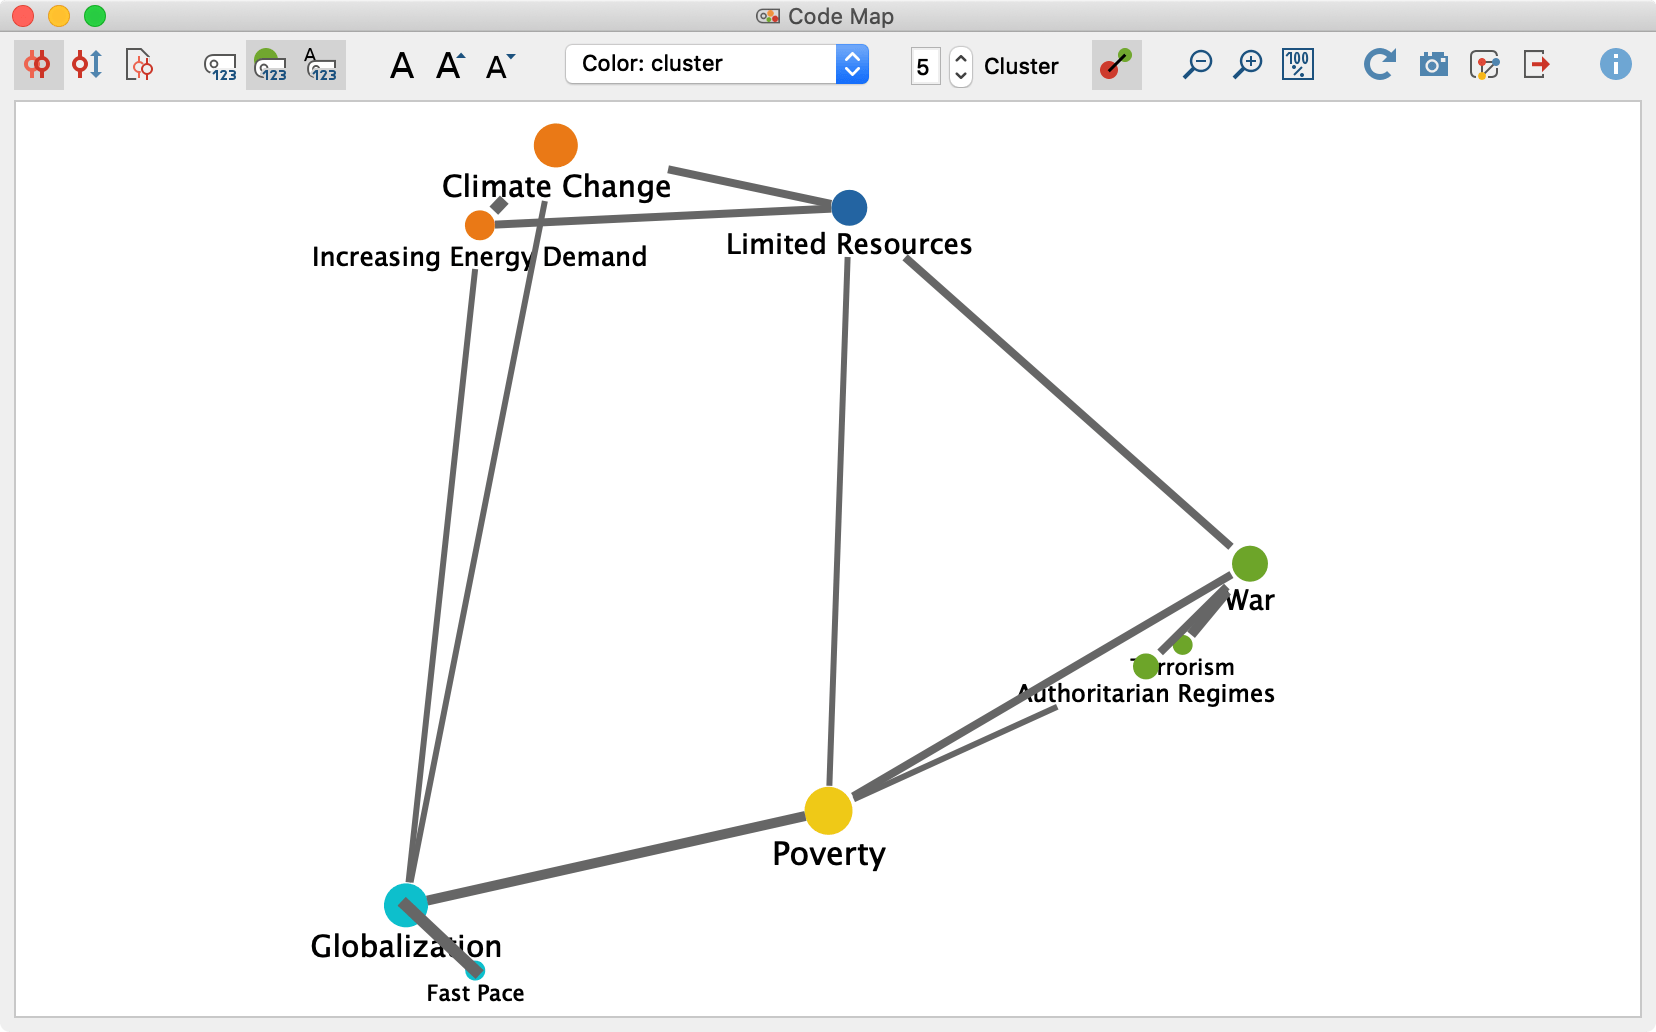
Each circle symbolizes a code, with the distances between two codes representing how similarly the codes have been applied in the data material. As a further option, the larger the circles the more code assignments have been made with that code. Colors can be used to highlight groupings (clusters). In addition, connecting lines between the codes can be activated, which indicate which codes overlap or co-occur. Optionally, the connection lines are displayed thicker the more coincidences there are between two codes.
Toolbar options:
You can use the toolbar at the top to adjust various settings for your code map.
The first three symbols allow you to set what aspect is analyzed to determine the similarity between two codes. These are the three options mentioned above:
![]() Analyzed relation of codes – Intersection of codes in a segment.
Analyzed relation of codes – Intersection of codes in a segment.
![]() Analyzed relation of codes – Proximity of codes in same document.
Analyzed relation of codes – Proximity of codes in same document.
![]() Analyzed relation of codes – Codes occur in same document.
Analyzed relation of codes – Codes occur in same document.
Changing these similarity settings recalculates the display of your code map.
Futher options:
![]() Display code frequencies - Displays the code frequency in the analyzed documents after the code name.
Display code frequencies - Displays the code frequency in the analyzed documents after the code name.
![]() Size of code symbols reflects code frequency – The more frequently a code is used, the larger its symbol will be displayed.
Size of code symbols reflects code frequency – The more frequently a code is used, the larger its symbol will be displayed.
![]() Font size reflects code frequency – The more frequently a code is used, the larger its name will be displayed.
Font size reflects code frequency – The more frequently a code is used, the larger its name will be displayed.
![]() Font – Select a font for the display, e.g. to adapt it to the font used in your publication.
Font – Select a font for the display, e.g. to adapt it to the font used in your publication.
![]()
![]() Increase and decrease font size – Adjusts the font size of the code names.
Increase and decrease font size – Adjusts the font size of the code names.
![]() – Determines the color of the code symbols.
– Determines the color of the code symbols.
Select cluster to assign a color to the codes according to their group affiliation. You can determine the number of clusters in the number field.
Select uniform to assign the same color to all codes.
Select Code System to adopt the color already assigned to the code in your "Code System".
![]()
![]() Zoom out, Zoom in – Zooms in and out of the displayed section of your map.
Zoom out, Zoom in – Zooms in and out of the displayed section of your map.
![]() Refresh – Reopens the options dialog box to select other codes or documents.
Refresh – Reopens the options dialog box to select other codes or documents.
Export code map
Symbols for export and further processing are available at the top right-hand corner:
![]() Copy current view to clipboard – Inserts a high-resolution image into the clipboard so you can paste it directly into a report or presentation.
Copy current view to clipboard – Inserts a high-resolution image into the clipboard so you can paste it directly into a report or presentation.
![]() Save as map in MAXMaps - Creates a new map in MAXMaps, the tool for concept maps in MAXQDA, and inserts the content of your code map here. You can edit the map later in MAXMaps.
Save as map in MAXMaps - Creates a new map in MAXMaps, the tool for concept maps in MAXQDA, and inserts the content of your code map here. You can edit the map later in MAXMaps.
![]() Export – Saves the display as an image file in PNG or SVG format. If you select Excel (XLSX) as the export format, all the calculated values are entered in the export file: (similarity matrix, distance matrix and coordinates).
Export – Saves the display as an image file in PNG or SVG format. If you select Excel (XLSX) as the export format, all the calculated values are entered in the export file: (similarity matrix, distance matrix and coordinates).
Code map interactivity
Code maps are interactive:
- Click on a code to select it in the "Code System”.
- Right-click a code and select Remove to delete it from the map. The map will then re-generate itself with the remaining codes.
Opening a code map from the Code Relations Browser
If you use the Code Relations Browser, MAXQDA creates a matrix which displays the common occurrence of two codes. Since exactly such an evaluation forms the basis for the code map, it can also be opened directly from the Code Relations Browser.
To do this click on the first icon on the far left:

MAXQDA will then create a code map with all codes that are displayed both in the columns and in the rows of the Code Relations Browser and that occur together with at least one other of these codes.
Notes on the analysis process and presentation
The classic multidimensional scaling method is used to position the codes on the map.
For this purpose, a similarity matrix is first calculated according to the display in the Code Relations Browser and then converted into a distance matrix. For the conversion, the column sums are calculated first, so each code is checked to see how often it occurs together with any other code. The maximum of these column sums is determined and defined as the maximum possible similarity. In each cell, the similarity of two codes is subtracted from this maximum.
A distance of 0 therefore means that two codes only ever occur together, i.e. never without the other. A distance corresponding to the maximum means that these codes never occur together. Please note that due to the reduction to a maximum of 2 dimensions (i.e. on one map) and this consequent angle of view, two codes may appear visually closer together than the distance matrix would suggest.
The codes are clustered by means of a hierarchical cluster analysis using the distance matrix. Average linkage is used as the clustering method.
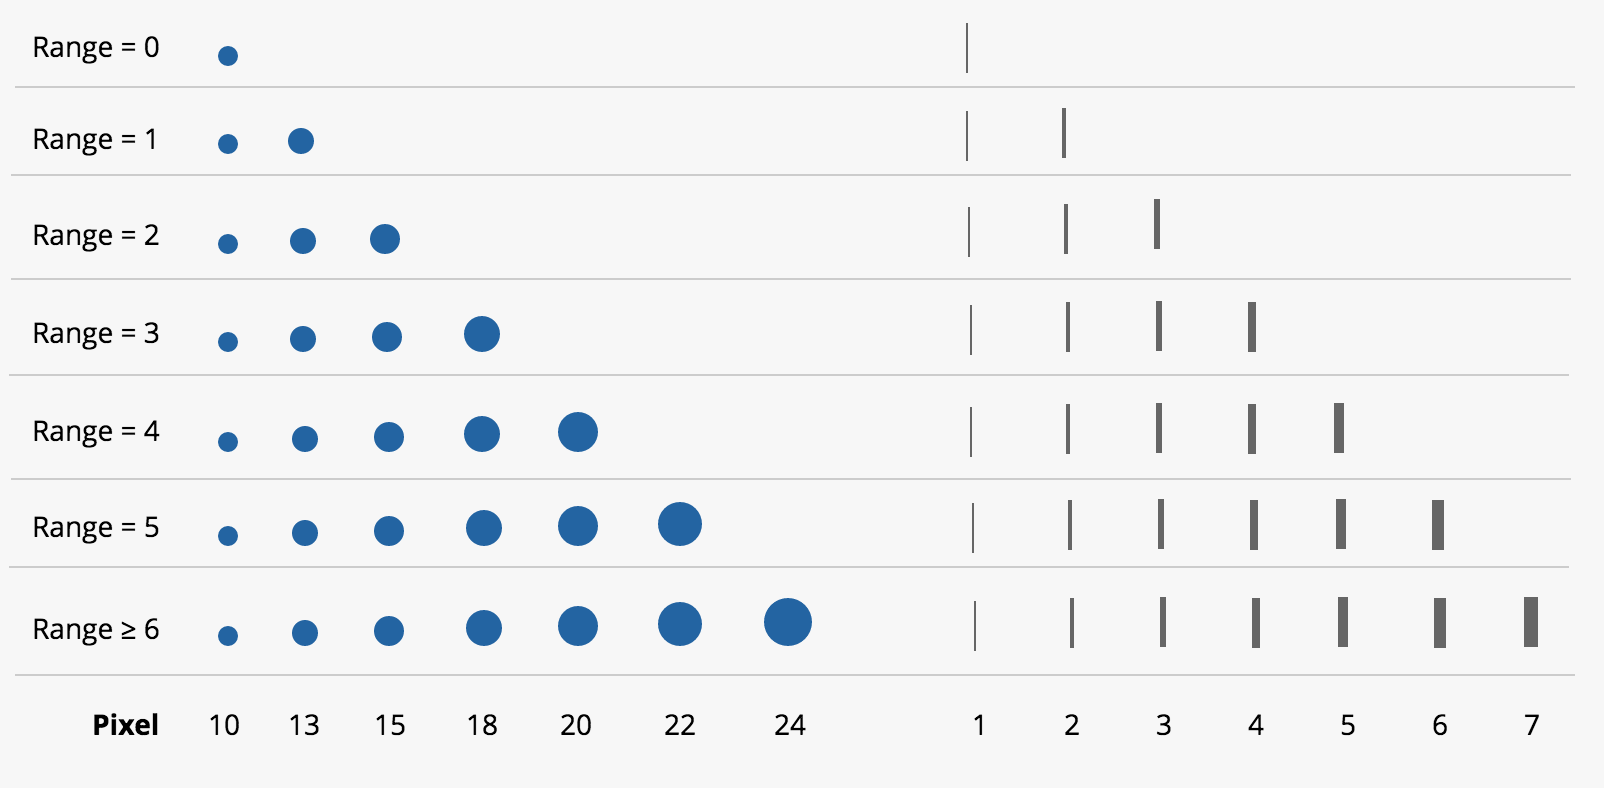
If the option Size of code symbols reflects code frequency is enabled, the determination of symbol sizes is similar to the Visual Tools Code Matrix Browser and Code Relations Browser: MAXQDA determines the smallest and largest code frequency of all displayed symbols and then divides the distance between these two values into seven equally-sized value ranges. The smallest value range receives the smallest symbol and the largest the largest symbol. In addition, the maximum distance between the displayed code frequencies is taken into account. For example, if codes occur only once or twice in the displayed documents, this distance is very small, and neither the smallest nor the largest symbols will be used, but two medium-sized ones, so as not to over-emphasize the difference.
The following graphic shows which symbol sizes are used at which distance between the smallest and largest values (the range). If the smallest displayed value is e.g. 5, and the highest is 8, then the range is 8-5 = 3. The cells with value 5 are then assigned the smallest symbol from row "3", the cells with value 8, the largest from this row. If all the visualized numbers are identical, a medium-sized symbol will be displayed for all values.


