
Settings let you adjust how MAXQDA looks and behaves, from the interface theme and language to default fonts, folders, and backups, plus the options for AI Assist and cloud connections. To open them, click the  Settings icon in the bottom bar of the MAXQDA window.
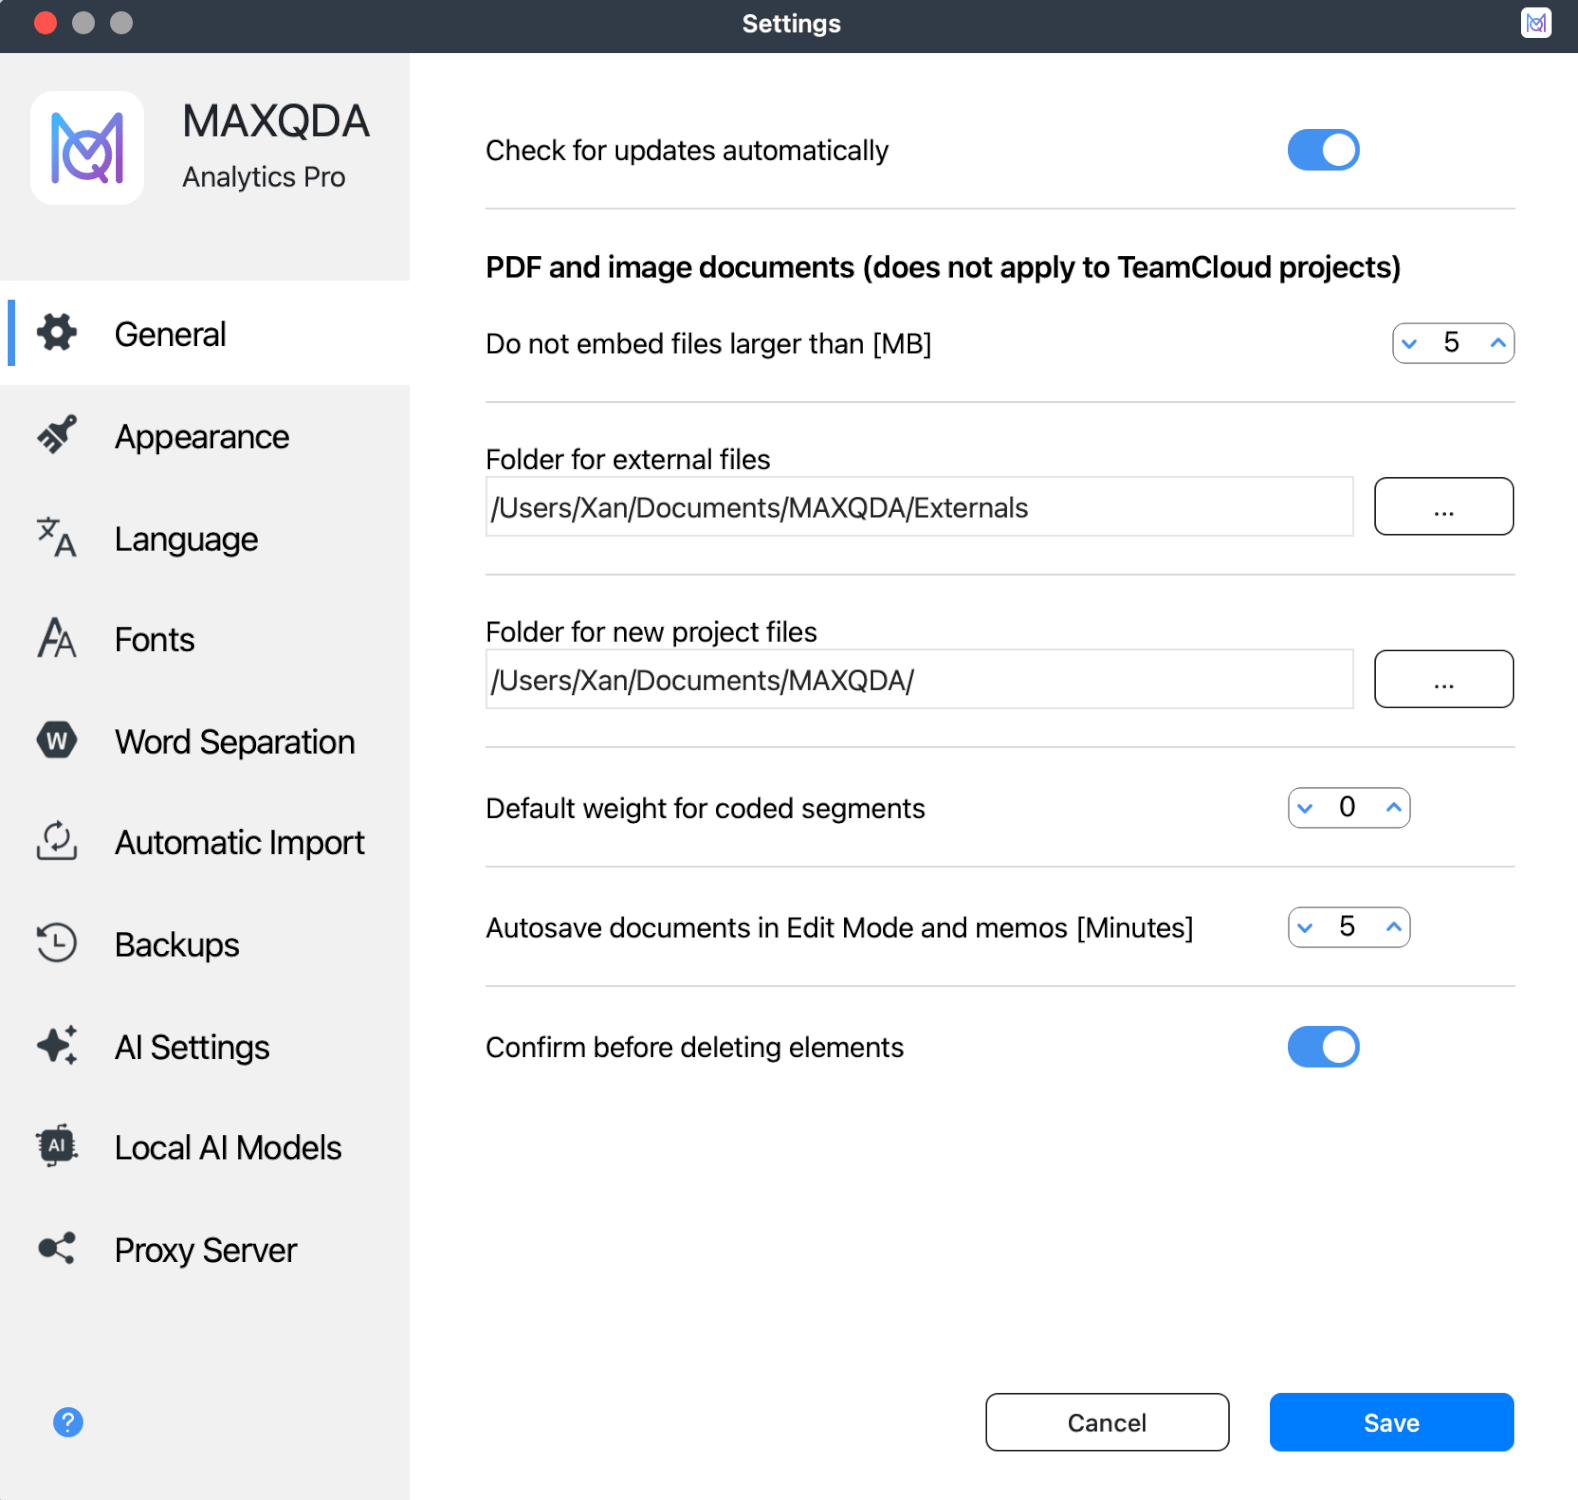
The Settings window is organized into sections that you can access from the sidebar on the left: General, Appearance, Language, Fonts, Word Separation, Automatic Import, Backups, AI Settings, Local AI Models, and Proxy Server. AI Settings and Local AI Models appear only if your license includes AI Assist.
Available settings
General
Check for updates automatically
When enabled, MAXQDA automatically checks for updates when it launches. We recommend downloading available updates to get the latest features and improvements.
Do not embed files larger than [MB]
This setting applies to PDF and image documents, but not to TeamCloud projects. It sets the size limit for imported PDF and image files. Files larger than this limit are stored externally instead of directly in the MAXQDA project file. The project contains only a reference to the external file. The default size limit is 5 MB, but you can adjust it as needed.
Folder for external files
Choose where on your computer to save externally stored files. These include audio and video files assigned to a document, as well as PDF and image files that exceed the size limit specified above.
Folder for new project files
Specify where MAXQDA saves new project files.
Default weight for coded segments
Each coded segment has a weight. Newly coded segments have a default weight of 0. You can change the default weight here.
Autosave documents in Edit Mode and memos [Minutes]
Specify the interval, in minutes, at which MAXQDA automatically saves edited documents and memos.
Confirm before deleting elements
When enabled, MAXQDA asks you to confirm before deleting code assignments, codes, documents, memos, and other data. This helps prevent accidental deletions.
When disabled, MAXQDA deletes these items immediately without asking for confirmation. If you accidentally delete something, you can restore it only by using the Undo function. We recommend keeping this option enabled to prevent accidental data loss.
Appearance
Interface theme
MAXQDA offers four interface themes. Browse the available themes using the carousel.
- Dark: Uses a dark background, which can help reduce eye strain during long sessions.
- Light: Uses a light background with a dark main menu.
- Light 2: Similar to the Light theme, but with a light main menu for a consistently light interface.
- System: Automatically matches MAXQDA's theme to your operating system settings.
Text size
Select Regular or Large to adjust the size of interface labels, including menus, title bars, dialog boxes, and the codes and documents windows.
Reset interface settings
Enable this toggle to reset all user settings to their default values. This can be useful if the interface behaves unexpectedly after changing interface settings.
Language
Interface language
Select the language used in the MAXQDA interface. The interface is available in 13 languages. Choose your preferred language from the dropdown menu.
Enable Spellchecking
Use this toggle to enable or disable spellchecking. When enabled, spelling mistakes in memos, documents, and summaries in the Summary Grid are underlined in red.
Spellcheck language selection
Select a language for spellchecking from the dropdown menu.
MAXQDA uses the language packs installed in your operating system. The dropdown menu displays all installed languages. To add more languages, click + Add Spellcheck Language to open your operating system's language settings. Spellcheck is available only for languages that use spaces between words.
Restart MAXQDA after installing additional language packs to make them available.
Fonts
New documents
Set the default font and size for new text documents.
New memos and QTT insights
Set the default font and size for text in new memos and QTT insights.
MAXMaps labels
Set the default font for labels in MAXMaps.
Word Separation
These settings apply to the current project only.
Characters to exclude
Click the button with three dots  to open a dialog box where you can specify characters to exclude from words. These characters act as delimiters in all word-based functions in MAXQDA and MAXDictio. In new projects, common punctuation marks (period, comma, semicolon, exclamation mark, question mark, etc.) and some special characters, such as quotation marks, are excluded by default.
If words in the Word Frequency result table or Word Cloud start or end with unwanted characters, add those characters to the list of excluded characters.
What counts as a word in MAXQDA
In MAXQDA, a word is any sequence of characters between two delimiters. The fixed standard delimiters are:
- Spaces
- Paragraph and line breaks
- Tab characters
All excluded characters also function as delimiters.
By default, hyphens are not treated as separators, so hyphenated compound words (e.g., "AI-generated") are counted as one word. To count the parts of compound words separately, add the hyphen to the list of excluded characters.
Ignore hyphens at the end of a line (PDF)
When enabled, MAXQDA tries to ignore hyphens used to split words at the end of lines in PDF documents wherever technically possible. This allows the separated parts to be analyzed as one continuous word.
Text language is Japanese
Enable this option when analyzing Japanese texts. MAXQDA uses a specific method to separate words in Japanese for accurate analysis.
Ignore particles (Japanese)
This option becomes available when Text language is Japanese is enabled. It excludes all Japanese particles (such as は, を, and が) from word-based analyses, such as the Word Cloud. For details, see how to analyze Japanese text.
Automatic Import
Select folders
Files in watched folders are automatically imported into the current MAXQDA project. Click Select folders to choose the folders you want MAXQDA to monitor. Files placed in these folders are imported if they do not already exist in the currently open project.
Backups
Enable automatic backups
When enabled, MAXQDA checks when the project was last saved each time you open it and creates a backup if necessary.
Backup interval [days]
Specify the number of days between automatic project backups. This determines how often MAXQDA creates a backup of your project.
Folder for backup files
Specify the folder where MAXQDA saves backup copies of your project.
AI Settings
This section appears if your license includes AI Assist. Here you can describe your research project to give AI Assist context (Project Information) and check your AI Assist Daily Usage. For details, see the AI Settings section of the AI Assist overview.
Local AI Models
Here you can connect MAXQDA to a language model on your own computer or your organization's server, so AI Assist uses that model instead of MAXQDA's cloud-based AI. Local AI requires AI Assist Premium. For setup steps and details about each field, see the Local AI setup guide. To choose a model, see how to choose a local model.
Proxy Server
Here you can specify a custom proxy server for MAXQDA to access cloud services (AI Assist, TeamCloud, Auto-Transcription). By default, MAXQDA uses your system's proxy server if one is configured in the operating system.
Currently used proxy server
Displays the proxy server currently used by MAXQDA. If no custom proxy is configured, this shows "No proxy server".
Use custom proxy server
Enable this toggle to configure a custom proxy server. When enabled, additional fields appear where you can enter the proxy server address and port.
