
This page helps you recover work if a team member has been working in a regular MAXQDA project file (MQDA) instead of the TeamCloud project file (MQTC), and now needs to integrate that work back into the team project.
This page describes a recovery workaround for work done outside the normal TeamCloud workflow. This is not the standard way to work with TeamCloud projects. For normal collaboration, see Your project cycle: Team lead or Your project cycle: Team member.
Understanding the problem
How to identify if you're working outside TeamCloud
If you're not sure whether you're working on the correct file, check the following:
- Check the title bar (see image):
- TeamCloud project: shows "TeamCloud project: [project name] (Cycle N)"
- Regular project: shows only the project name
- Check the TeamCloud menu (see image):
- TeamCloud project: options like Upload Project are available
- Regular project: TeamCloud options are missing

Why this is a problem
Working in a regular MAXQDA project file (MQDA) means you are outside the TeamCloud workspace. As a result:
- The Upload Project function does not work on MQDA files
- The team lead cannot use Import Team Member's Files
- Your changes cannot be synchronized with the TeamCloud project
TeamCloud upload and import functions are designed to work with MQTC files in the TeamCloud workspace. Regular MAXQDA projects (MQDA) use a different file structure and are not compatible with these functions.
For more information about MAXQDA file types, see MAXQDA File Types.
Recovery: Reintegrating your work into TeamCloud
Because you're working outside the TeamCloud workflow, you cannot use the standard import process. Instead, you need to use MAXQDA's Home > Teamwork > Export/Import feature to merge your work back into the main project. For more information about the Teamwork workflow, please visit this page.
The recovery process involves four main steps:
- The team member exports their work from their MQDA file
- The team lead exports the current TeamCloud project as a regular MAXQDA project
- The team lead merges the team member's work using Teamwork Import
- The team lead uploads the merged project back to TeamCloud and starts a new cycle
Step 1: Team member - Export your work
As the team member who has been working in the MQDA file, you need to create a Teamwork Export file:
- Open your MQDA project file in MAXQDA
- In the Home menu, click Teamwork > Teamwork Export
- In the export dialog, select all the elements you want to share with the team lead
- Click Export and save the file with the .MQEX extension
- Send this export file to the team lead
Note:
The Teamwork Export feature creates a file that contains only your analytical work (codes, memos, etc.), not the entire project. This is different from the TeamCloud upload process, which synchronizes the entire project file.
For more information about merging MAXQDA (MQDA) project files, visit the "Merging two MAXQDA projects" page.
Step 2: Team lead - Export the TeamCloud project as an MQDA project
TeamCloud automates merging when team members upload their work. Because of this, manual Home > Teamwork > Export/Import functions are not available in TeamCloud projects. To merge work done outside TeamCloud, the team lead must temporarily work with a regular MAXQDA project.
As the team lead, you need to temporarily work outside TeamCloud to merge the team member's work:
- Open your TeamCloud project (MQTC) in MAXQDA
- In the TeamCloud menu, click Export as Local Project to create an MQDA file
- Choose a location to save the exported project and click OK
- Close your TeamCloud project
- Open the newly exported MQDA file
The exported MQDA file is a copy of your TeamCloud project at this point in time. Your original MQTC file in the TeamCloud workspace remains unchanged. You will work on this copy, then upload the merged result back to TeamCloud.
Step 3: Team lead - Import the team member's work
Now that you have the MQDA file open (not the MQTC file), you can use the Teamwork Import function:
- With your exported MQDA project open, go to Home > Teamwork > Teamwork Import
- Select the MQEX file that the team member sent you
- Review the import dialog and select which elements you want to import
- Click Import
- MAXQDA will merge the team member's work into your project
After the import is complete, review the merged project to ensure all expected changes are present.
Step 4: Team lead - Upload the merged project back to TeamCloud
Now you need to return the merged work to the TeamCloud workflow:
- With the merged MQDA project still open, go to the TeamCloud menu
- Click Upload Project for Team (Start Cycle N)
- This converts your merged MQDA project back into an MQTC TeamCloud project
- Team members should download the updated project and continue working in the normal workflow
For more information about starting a new TeamCloud project cycle, see LEAD: Start new cycle or end project.
When you upload the merged project, MAXQDA converts it back into a TeamCloud format (MQTC), stores it in your TeamCloud workspace, and uploads it to the TeamCloud server. Starting a new cycle ensures all team members receive the updated project file.
Preventing this problem
How team members can avoid working outside TeamCloud
- When opening a project, confirm the title bar shows "TeamCloud project: [project name] (Cycle #)" and that TeamCloud menu options are available.
- Always open TeamCloud projects from the MAXQDA start screen under Team Projects. Do not open projects by double-clicking files in your file system.
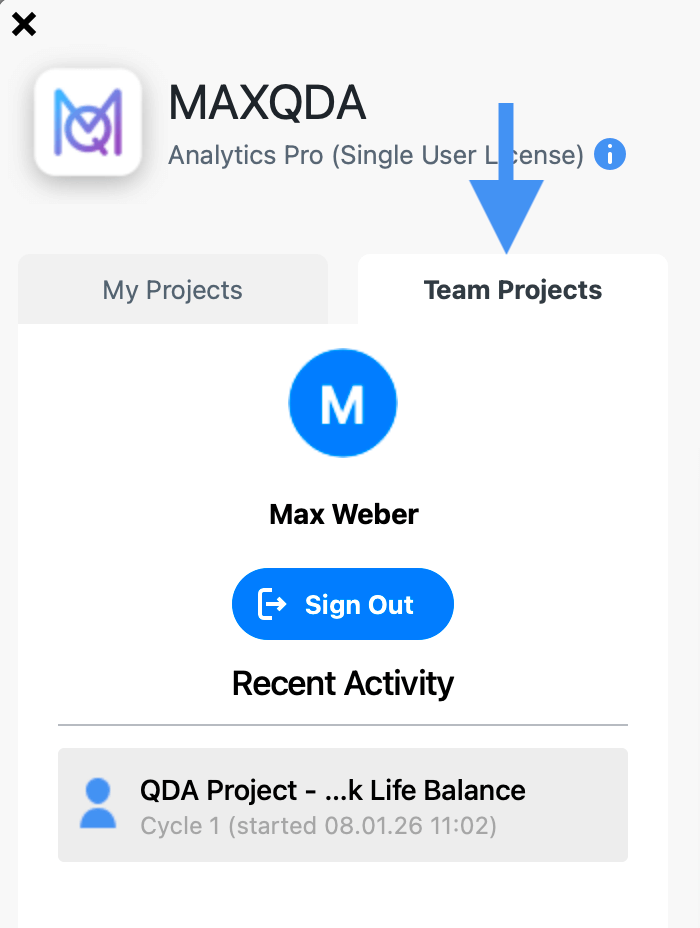
- Make sure you are working on the MQTC file in your TeamCloud workspace, not an MQDA file elsewhere.
- Do not use Save As on TeamCloud projects, as this creates regular MAXQDA projects outside TeamCloud.
- For backups, use TeamCloud > Backups > Create Backup. See Backup of TeamCloud Project for details.
For the team lead: monitoring team member uploads
As the team lead, you can help catch this problem early by:
- Checking that team members upload their work regularly
- Watching for upload notification emails
- Reviewing the “Recent Activity” section on the MAXQDA Account website
