Object properties can only be modified when the selection mode is activated. Objects can be placed in the desired position in the drawing pad by holding down the left mouse button and dragging the object to its new place.
When you select an object with the right mouse button, a context menu will open that includes the option labeled properties. Here, you can determine properties of a single selected object.

You can choose from the following properties, among others:
“Label” Tab
Label: i.e. the name of the object. This doesn't have any effect on the text name in the MAXQDA project. If you change the name of an object in a worksheet, e.g. the name of a text “Interview1” into “Peter Miller’s,” the name of the text in MAXQDA remains “Interview1.”
Font, Font size, Font color: Diverse properties can be defined for the object, including font, font size, and font color.
Borders: a frame is drawn around the object.
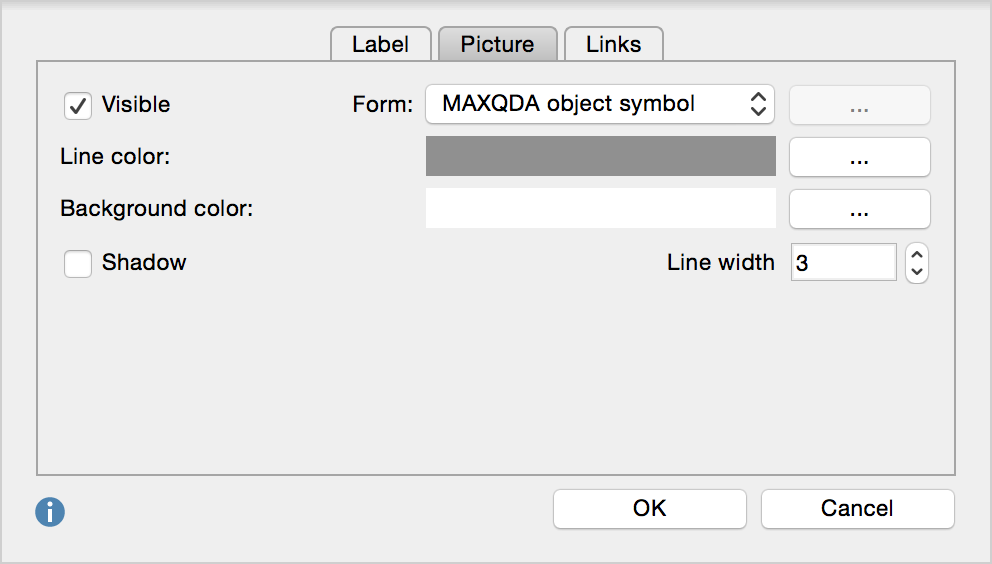
“Image” Tab
Visible: if this option is not selected, only the object’s label is shown.
Form: For free objects, here you can define whether the object should be a circle, a rectangle or a rectangle with rounded corners. In addition, external graphics can be defined.
Shadow: a shadow is drawn around the object. This only applies to standard objects (not for imported bitmaps and graphics).

“Link” Tab
External link: Insert a reference to a local file here and it will be opened if you click on the object.
Geo Link: Insert a path to a .kml/.kmz file with geoinformation and it will be opened if you click on the object.
Format Painter to Copy Properties
MAXMaps permits the transfer of properties from one object to other objects. This allows for a more uniform appearance among different objects. The function is applicable to all objects including connection objects, and it also enables you to transfer the color and line type of one connecting line to another one.


How it works:
1. Select the object whose properties you wish to assign to another object.
2. Click on the option format painter ![]() in the toolbar.
in the toolbar.
3. Select the target object, i.e. the object to which the format shall be applied.
4. Click on the option format transfer ![]() in the toolbar.
in the toolbar.
Subsequently, the same format can be applied to an arbitrary number of objects. You can do this simply by selecting these desired objects and then choosing the format painter option. If you wish to transfer the format to several objects at the same time, you must select all of them using the mouse and holding down the Ctrl key.
Extending and Reducing the Size of Objects
In the selection mode, every selected object can be extended or reduced by clicking on the “+” or “-” symbols found in the toolbar.
In the selection mode, you can jointly extend or reduce objects simply by drawing a frame around the objects with the mouse. You can then change the object size using the method described above. The relation between the size of the picture and the font size can be defined in the properties dialogue window.
Grouping Objects
Objects can be arranged into groups. To do this, use the mouse to first draw a frame around the object. The same can also be accomplished by holding down the Shift key and clicking on the desired objects one after another and clicking on the Grouping symbol, which can be found approximately in the middle of the toolbar.
Grouped objects can be separated again in the same way: Select the group and then click on the icon Resolve grouping. Within an established group, the separate elements of the group can no longer be modified with the individual properties menu. If at any point later on, you wish to modify an element, you have to resolve the grouping first.

Picture Exchange - Importing Pictures
When importing MAXQDA objects, initially the standard icon assigned in MAXQDA is transferred. It is then possible though to exchange the picture and to import another picture, clip art, or drawing.
This works as follows:
- Select the desired object with the right mouse button. Then, choose the option Change picture from the context menu.
- Instead of the initial standard picture, the picture of your choice can be imported. JPG, PNG, and TIF are all permitted formats.
Layer
Objects can be assigned to different layers. If you ignore this option, all newly inserted objects will be assigned to the same standard “base” layer. The Layer option makes it possible to display or to remove parts of the drawing, so you can, for example, design a presentation that gradually increases in complexity. You can start building a model with only a few elements and gradually increase the number of elements that are displayed, thus creating a structure that continually gains complexity.
The Layer function can be called up by clicking the layer icon in the toolbar. ![]() This will open a window in which the existing layers are listed. At first, this includes only the “Base” layer. You can define a new layer by clicking on the arrows to the right of the layer icon, then selecting “New”.
This will open a window in which the existing layers are listed. At first, this includes only the “Base” layer. You can define a new layer by clicking on the arrows to the right of the layer icon, then selecting “New”.

Any object on the drawing pad can be assigned to a certain layer. Just choose the option Layer after selecting the object with the right mouse button and assign the object to the desired level.

To display a level, simply put a checkmark in front of the desired layer in the dialogue window.
Moving Objects to the Foreground or Background
To arrange the objects of a map according to your needs, it is necessary to be able to move objects from the foreground to the background and vice versa. The corresponding Bring to the front and Move to the back options are found in the toolbar.

This procedure is arranged intuitively:
- Select the object whose position shall be changed.
- Click on Bring to the front or Move to the back to achieve the desired position.