Welcome to the MAXQDA Tailwind user manual. In this comprehensive guide, you'll discover everything you need to get started with MAXQDA Tailwind (Beta), a web application powered by advanced AI technology that's here to help you make sense of complex data.
What does Beta mean?
Currently, MAXQDA Tailwind is in its beta phase, which means it’s up and running for you to use but it might not function perfectly just yet and produce unexpected results. During this phase, certain limitations are in place:
- Project limit: You can create up to 5 projects.
- Document limit: Each project can have a maximum of 20 files, where each document is limited to 120k characters.
- Topic limit: Each project can have a maximum of 20 topics.
🚪 Who can use MAXQDA Tailwind?
MAXQDA Tailwind is available based on your MAXQDA 24 license status:
- MAXQDA 24 users with:
- AI Assist Premium: Full access to the MAXQDA Tailwind beta version.
- AI Assist Free: Enjoy a 7-day trial of the MAXQDA Tailwind beta version.
- Users of older MAXQDA versions:
If you're using an older MAXQDA version, you need to upgrade to MAXQDA 24 to use MAXQDA Tailwind. Learn how to upgrade here.
- No MAXQDA 24 license:
If you don't have MAXQDA 24 yet, you can still try MAXQDA Tailwind by getting a free MAXQDA 24 trial. Learn how to get your trial on the MAXQDA Trial Version page.
Checking your license for included add-ons
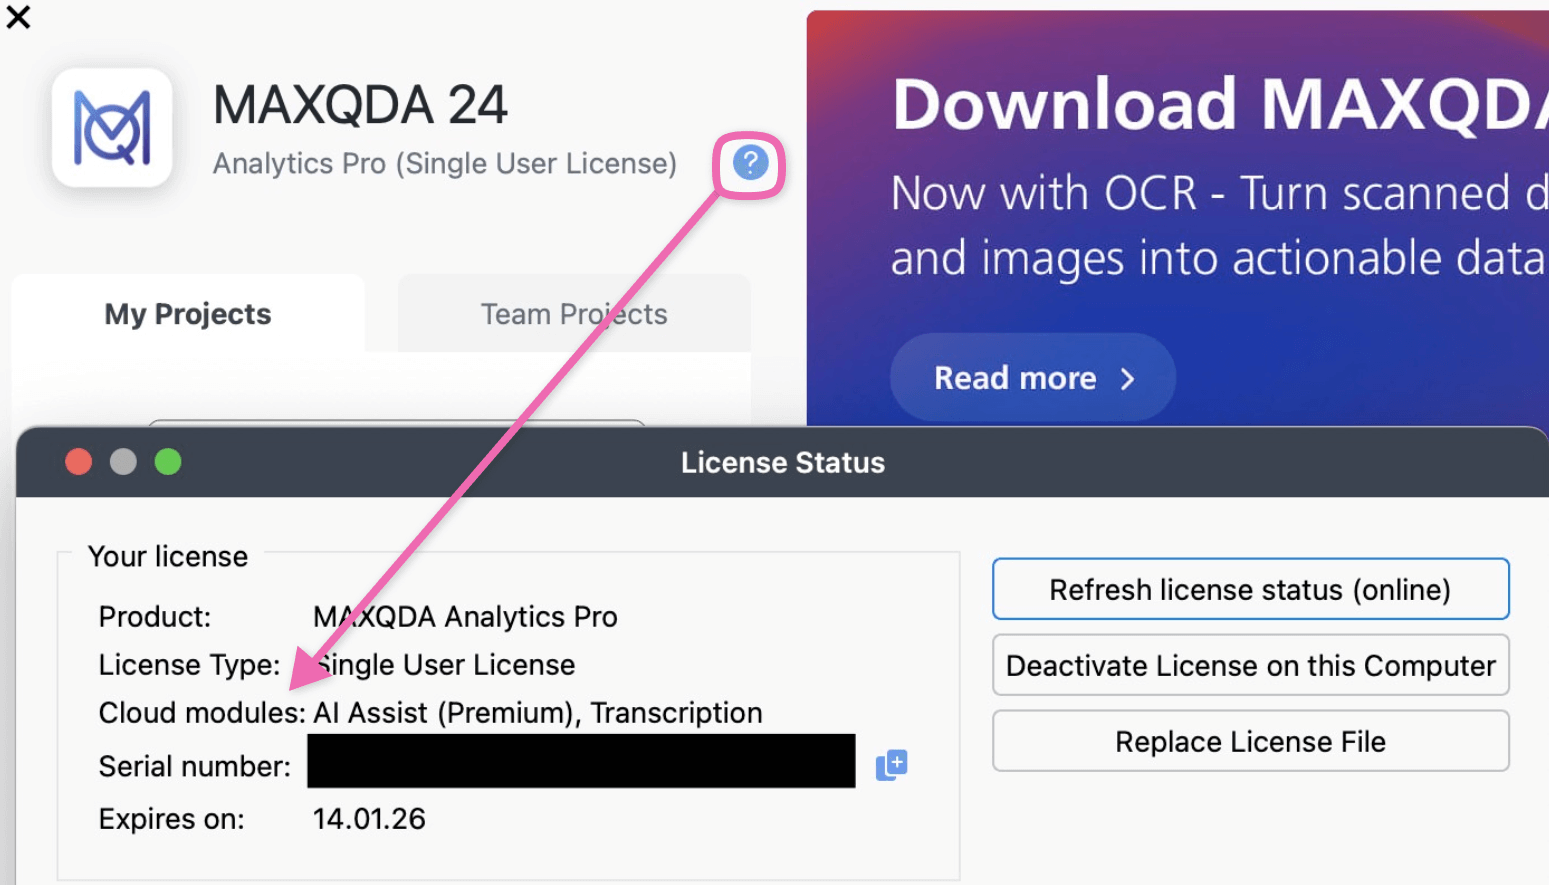
To check if your MAXQDA 24 license includes the AI Assist add-on, follow these steps:
- Launch MAXQDA and click on the
 License Status icon in the welcome screen.
 - In the window that opens, look at "Cloud Modules," refer to the image below for reference.
- Verify wether or not AI Assist is listed there.
Getting Started with MAXQDA Tailwind
🚀 MAXQDA Account creation and Tailwind login
To use MAXQDA Tailwind, you need a free MAXQDA Account. If you don’t have one yet, you can find the steps to create one below. If you already have an account, you can skip Step 1. If you have used MAXQDA Transcription, AI Assist, or TeamCloud within MAXQDA, you can also skip Step 2.
✨Step 1: Create your MAXQDA Account online
- To create a MAXQDA Account navigate to the following page: https://account.maxqda.com/login
- Click on Sign Up, below the Log in button, to access the registration page.
- Fill in the required fields.
- Click Register.
- Finally, follow the prompt to confirm your account by clicking the link in the confirmation email.
🔗Step 2: Link your MAXQDA Account to your MAXQDA license
Once you've created your MAXQDA account, you’ll need to link your MAXQDA license. The steps to do this will vary depending on your license type.
For personal licenses:
Users who have a personal MAXQDA license (single-user and student licenses) can activate their Tailwind trial directly on the webpage.
- Navigate to https://tailwind.maxqda.com.
- Open the Personal License tab.
- Insert your MAXQDA serial number. (You can find information on where to find your serial number here.)
- Your account is now linked to your MAXQDA license.
For institutional licenses:
After creating your MAXQDA Account, you'll need to log into the MAXQDA desktop application to link your license to your new account:
- First, open a project in the MAXQDA desktop software on your computer.
- Ensure you have an active internet connection to complete the sign-in process and link your account.
- Then, in the top right corner next to the avatar, click to Sign in.
- Enter your MAXQDA Account credentials (email and password).
- To stay logged in, you can optionally check the Remember me box.
- Lastly, click Sign In.
- Your account is now linked to your MAXQDA license.
Can't see the sign-in option in your MAXQDA desktop application?
If you cannot locate the sign-in option in your MAXQDA desktop application, it's important to understand that a license for AI Assist is required.
While licenses for TeamCloud and MAXQDA Transcription do allow you to sign in, they do not grant access to MAXQDA Tailwind on their own. Therefore, even if the sign-in option is visible, you must obtain the AI Assist add-on to gain access. Check your AI Assist eligibility here.
🔑 Step 3: Log into MAXQDA Tailwind
- You can either log directly into MAXQDA Tailwind, following the steps below:
- Go to https://tailwind.maxqda.com/login.
- Enter your MAXQDA account credentials (email and password).
- Click Log In.
- Alternatevly, you can either use the MAXQDA Account Dashboard, which allows you to easily navigate and access various MAXQDA cloud modules, including MAXQDA Transcription and MAXQDA Teamcloud.
- Go to https://account.maxqda.com.
- Enter your MAXQDA account credentials (email and password).
- Click Log In.
- Finally, choose MAXQDA Tailwind.
Welcome to MAXQDA Tailwind. You can now explore its powerful features.
Continue reading to learn how to navigate it with ease.
🚀A brief overview of the MAXQDA Tailwind workflow
To start, create a new project with a clear name and description. Then, import your documents, and the app will generate summaries for each. Explore topics by manually inputting them or using AI for extraction. After creating topics, develop summary tables for comparative analysis to examine themes across different files and gain deeper insights.
🧭 Navigating the interface
The MAXQDA Tailwind interface consists of two primary components: the navigation sidebar on the left and the main workspace on the right. The image below demonstrates this layout.

🔍 The sidebar navigation
The sidebar navigation, located on the left in the image above, allows you to access various menu items for managing different aspects of your project. You can minimize this sidebar to maximize your working space in the main panel.
Toggle sidebar visibility:
- To hide the sidebar, move your mouse over the navigation bar and click on the blue hide sidebar arrow that appears.
- To bring the sidebar back, click on the show sidebar icon.
Initial login and project menu items:
- First login: When you first log in, you will see the Projects Dashboard. This is the home page of MAXQDA Tailwind.
- Opening a project: When you open a project, additional menu items will appear in the navigation sidebar and you will be directed to the Data Dashboard. The layout will look like this:

- Navigating menu items: You can click on any of the other menu items to access their respective features and tools.
The  Help & Support Menu
You can find the "Help & Support" menu at the bottom of the sidebar navigation. It provides access to a variety of resources and information, including this manual.
These links will guide you to detailed information and support resources to help you make the most of your experience with MAXQDA Tailwind.
🔒 Log Out
You can log out of MAXQDA Tailwind using the sidebar. To sign out, follow these steps:
- Click on your avatar and username at the bottom of the navigation sidebar.
- Click on the Log Out option to complete the signing out process.
After clicking the Log Out option, you will be signed out of your account and returned to the login screen.
Manage your MAXQDA Account
You can manange your MAXQDA Account directly in MAXQDA Tailwind.
- Click on your avatar and username at the bottom of the navigation sidebar.
- Then, click MAXQDA Account Settings, to open the account management page.
Account management features
On the MAXQDA Account management page, you have the flexibility to make the following edits:
- Profile picture: Add or change your profile picture.
- Name: Update your name as it appears in all connected services, and MAXQDA.
- Language: Change the interface language between English or German.
- Email address: Modify your email address.
- Password: Change your password for enhanced security.
- Delete Account: Permanently delete your account. This delete all data you may have uploaded across all MAXQDA's online services.
Please note that these settings apply across all services connected to your MAXQDA Account, including:
- MAXQDA Tailwind
- MAXQDA TeamCloud
- MAXQDA Transcription
- MAXQDA AI Assist
The workspace
Each menu item offers access to a distinct workspace, beginning with the ![]() Projects Dashboard, which serves as the main hub where all your projects are listed. After clicking on a project, you can navigate to the
Projects Dashboard, which serves as the main hub where all your projects are listed. After clicking on a project, you can navigate to the ![]() Data Dashboard, then to
Data Dashboard, then to ![]() Topics, and finally to
Topics, and finally to ![]() Summary Tables.
Summary Tables.
We discuss the dashboards within these workspaces in detail on the corresponding pages of this manual.
🌐 Supported languages
MAXQDA Tailwind currently supports the following output languages.
- English
- German
- Spanish
- Turkish
- French
- Italian
- Portuguese
- Japanese
- Chinese
- Russian
The input language of your documents may differ from this list and from your output language.
🔧 Support and resources
If you need more help, our chatbot is here for you around the clock. To accesst it, click on the icon in the bottom right corner of this page.
Additionally, here are some helpful resources:
Share your feedback
Your feedback is vital for enhancing your experience, so please share your thoughts! We're thrilled to have you on this journey!
🌈 Data security
At MAXQDA, we take data protection very seriously. For more information on how we manage and safeguard your data, please visit our Data Protection Policy page.
Open-Source Licenses
MAXQDA Tailwind incorporates several open-source software components. While these technical details aren't necessary for your regular use of the application, our Open Source Information webpage provides a complete listing as required by licensing agreements.