Qualitative data analysis (QDA) almost always requires several “rounds” of coding to achieve the best insights into your data. Refining your initial codes and coded segments by breaking down broad categories into specific terms can help you find more precise answers to your research questions.
Unfortunately, this important step in the data analysis process can also be one of the most complex and time-consuming because you have to reevaluate and possibly re-code all of your previous coding work. With this in mind, MAXQDA offers you a new feature that simplifies and accelerates the whole procedure – the Smart Coding Tool!

The Smart Coding Tool is best described as a table tool you can use to compile your coded text segments for a specific code. It makes assigning individual data segments to codes and subcodes a great deal easier, faster, and – above all – clearer.
It is also the ideal way to get an overview of the contents of a category, review your assigned categories and, if necessary, change relevant categories to customize your categorization system (i.e. by adapting the name of a category or exploring where and how a category has been assigned). For example, if you want to break down a category called “family” by adding the subcategories “parents”, “siblings”, “extended family”, etc., this is the tool for the job. This article will give you a quick overview of how the Smart Coding Tool can help you during the advanced stages of coding.
If you are currently using an older version of MAXQDA, click here to explore your upgrade options before continuing:
Let’s get started
1. Import your data into MAXQDA and start coding as you would normally, depending on your theoretical framework or the conceptual QDA structure you have chosen to work with. When you are done with this initial round of coding, take a few moments to review your categories, or “code system”, and categorized data points, or “coded segments”.
In this example, we have coded interviews from a study called “Life Satisfaction” using broad categories for the first round, such as “Emotions”, “Education”, “Interests”, and a few others. Now is the perfect time to deploy MAXQDA’s Smart Coding Tool, to help us break down these categories one by one into more specific codes in the second round of coding.
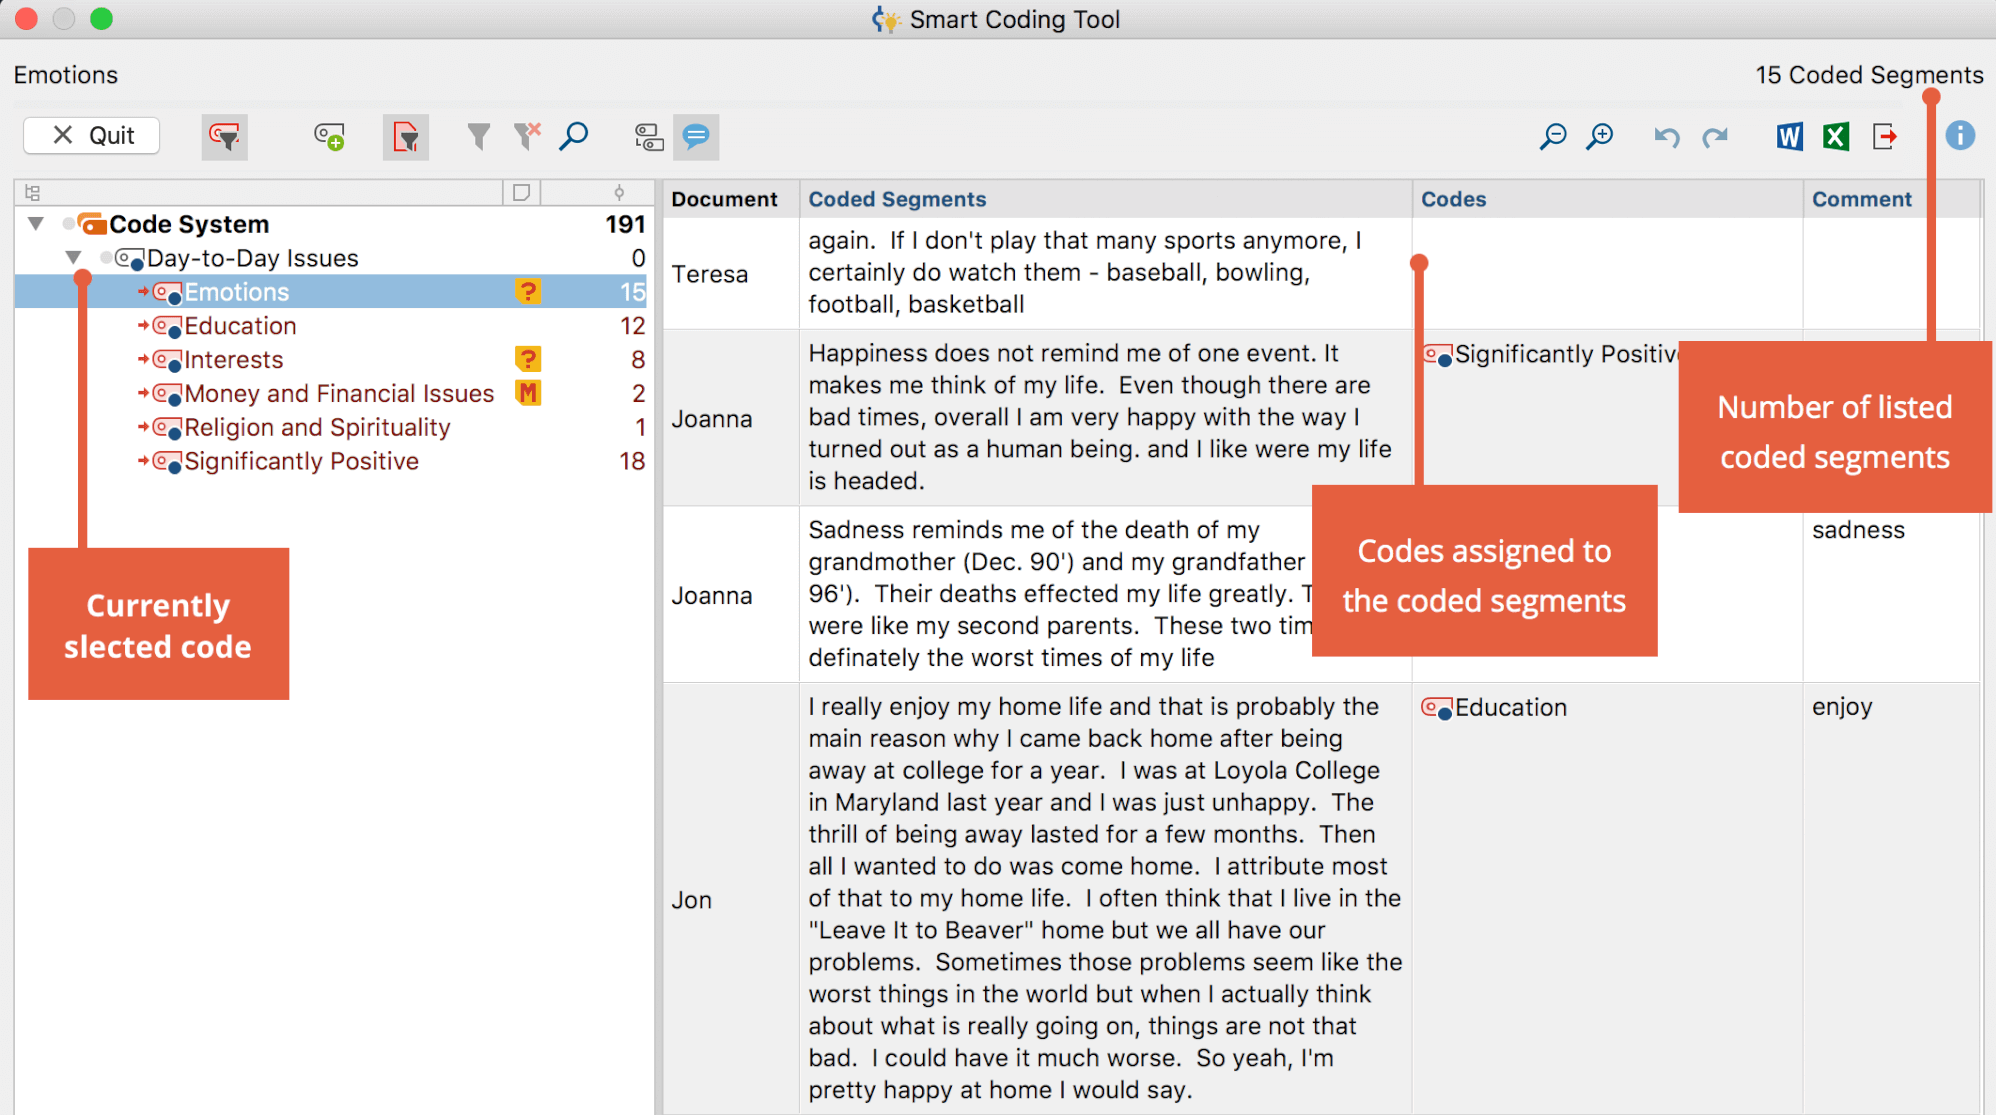
2. Before opening the Smart Coding Tool, activate the categories (or “parent codes”) you want to review. Next, click the icon  in the Retrieved Segments window or in the Overview of Coded Segments, which you can find in the Reports tab. The Smart Coding Tool window will then immediately pop up on your screen.

The Smart Coding Tool window consists of two display fields – the “reduced coding system” (only activated codes are displayed) on the left side and a table on the right, in which the coded segments (assigned to the category shown on the left), their source (name of the document/audio file/video clip, etc.), and additional codes within the same text segment are listed.
The Smart Coding Tool also has a column for comments. This is a great space that you can use to describe your category or to identify “boundary cases” (text segments that are more difficult to allocate to a certain category). We recommend using this feature when working in a research team or if you have a large data set and are coding in several rounds over long periods of time.
Next Steps
Customize your code system
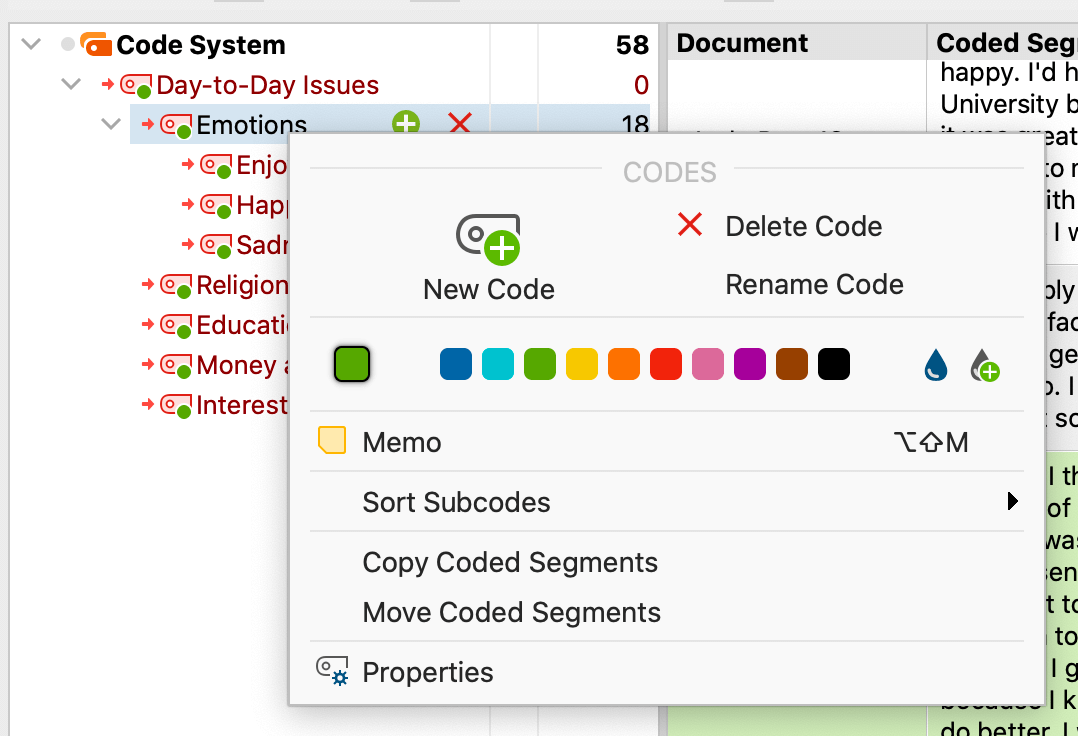
You can customize your code system throughout the entire analysis process with MAXQDA. You can add new codes, change the code colors, and create code memos. You can even change the hierarchical order or layout of your “code tree” in the Code System window by re-ordering your parent codes and their subcodes as many times as you want.
3. To do this, simply click on the relevant code and drag it to wherever you want to place it in the code system. Any changes you make will then automatically be reflected in your coded segments as well, so you do not have to worry about re-coding all of your data if you reorganize or your code system in later coding rounds. All the functions available in the Code System context menu are also available in the Smart Coding Tool, so you don’t even have to close it to, for example, make changes to your code names or colors, etc.

Breaking down parent codes into subcodes
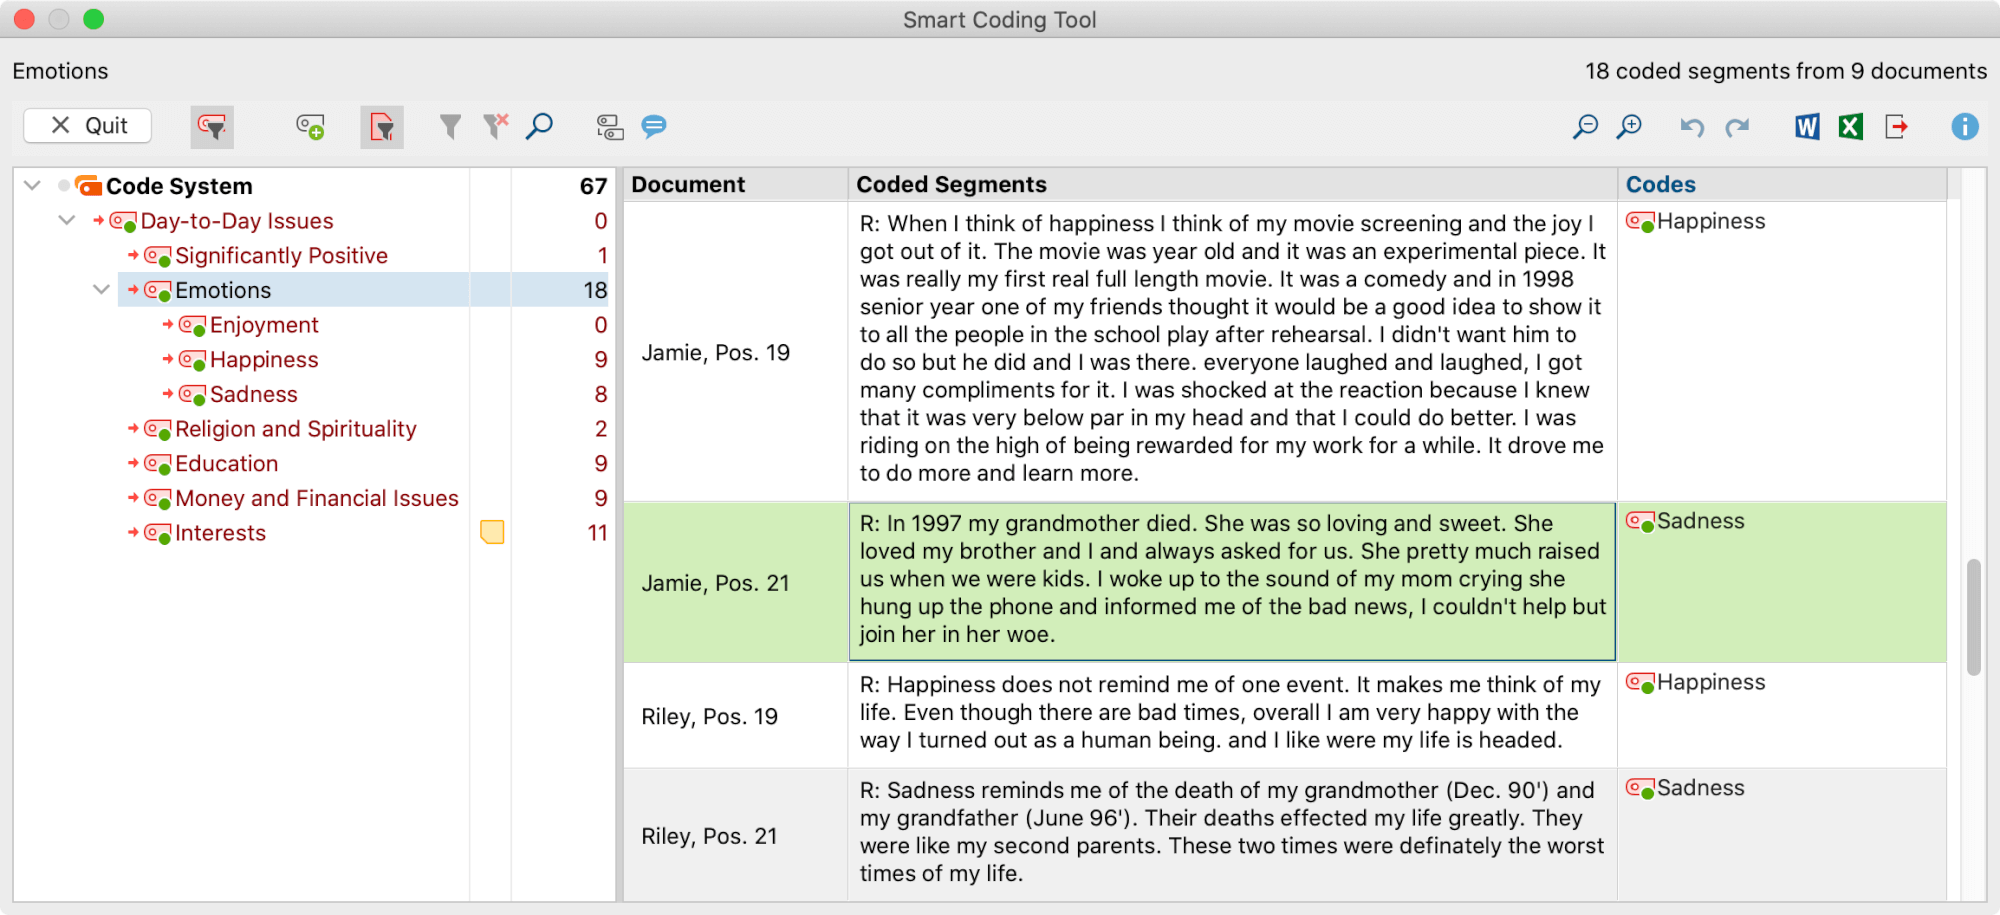
The Smart Coding Tool displays the coded segments of one parent code at a time. That makes it very easy for you to compare the contents of a category and to identify any appropriate subcategories. In our example, we have found it necessary to divide our parent codes into more precise subcodes. In this example, we would like to differentiate the code “Emotions” into precise emotions, such as “Happiness”, “Enjoyment”, “Sadness”, “Anger”, and so on.
4. First, select the parent code in the code system, then simply add a new code for each emotion by clicking “New Code”.
Need help? Check out these 5-minute video tutorials on how to code in MAXQDA, organize your code system, use the Creative Coding function, and export your code system:
5. Next, use the Smart Coding Tool’s table format to easily review every segment coded with “Emotions” and then assign one of your new subcodes to it via drag and drop. Alternatively, you can right-click on a row of the table and use the context menu to add and assign a new code. The newly assigned code is then immediately displayed in the “Codes” column.
This broad parent code is now much more specific and our analysis of the interview participant’s answers will be far clearer when it comes to present the results of the study.
Refine coded segments
As we have seen so far, the Smart Coding Tool is the ideal feature for reviewing and refining your coded segments during advanced rounds of coding. Once you have re-worked your codes, you may find that several of your coded segments are actually better suited to different categories than you had thought during the first round of coding.
6. To re-assign a coded segment in this case, click on the row in the table and drag it onto the more appropriate code in the code system. It’s as simple as that!
To delete the code you had assigned to it initially (or any other unsuitable code), click on the X next to the code’s name in the “Codes” column.

7. You may also want to only re-assign a specific part of the coded segment to another code or break-up a coded segment into several new subcodes. To do so, double-click on the row and then select the portion of text you want to re-code. From there, simply drag and drop it onto the code of your choice in the code system.
The newly assigned code is then immediately displayed in the “Codes” column of the Smart Coding Tool table. No need to recode your data line by line in each of the documents!

Questions?
In this short guide to conducting advanced rounds of coding with MAXQA we have seen how the Smart Coding Tool can make the process faster and easier. If you are still unsure of how to use the tool, check out our online manual for a step-by-step guide and a detailed description of each of the Smart Coding Tool’s functions.
Please also feel free to contact our Customer Support Team, if you run into any issues.
Research is a journey, travel it well!
Editor’s note: this post has been updated from its original version published in August 2018.


