Linking Codes to Memos

Similar to document segments, memos can also be linked to a code. You can do this via the Code Quick List, which is symbolized by the blue arrow in the memo toolbar. Clicking on this symbol opens the most recently-used codes, so you can choose which ones to assign to the memo. If the code you are looking for is not in the Quick List, simply click on the code in the “Code System” and try again. The code should now be listed at the top of the list.

Linking a memo to a code

The linked code is then displayed with its complete path (codesubcodesubcode) in the Codes area in the top right of the memo window.

If you later decide to remove a linked code, simply click on the code in the memo window and click on the toolbar symbol of the blue arrow with a red x on it.

Was this article helpful?


Searching for Text in Memos

While a targeted search for a specific memo based on attributes such as “Document name”, “Author”, “Creation date”, or “Memo title” is realized within the “Overview of memos”, the search for actual words or strings in the memos themselves is realized using the Lexical Search function - unless a standard search in the “Preview” column, which includes the first 63 characters of the memo, is sufficient.

To search in the memo text, select Analysis > Lexical Search and enter the search word or words.

If you want to search in the memos, you must specify In memos as the search criterion in the Lexical Search window; otherwise the search will take place in the documents themselves.

Searching for “health” in the project memos

The results are shown as a list of all memos that contain the search string in the memo text. This table can be worked with as described above. You can sort, jump to the document, edit the memos, etc.

Tip: A single click in the results table will highlight the memo in MAXQDA and in case of an In-Document Memo the “Document Browser” will be scrolled to the memo icon. A double click will open the memo and highlight the search hit.

Was this article helpful?


Exporting a Selection of Memos

The result of a search for specific words in memos is a table listing all the memos containing the words. The same type of result, memos in a table, is obtained through a search for linked memos or when viewing the memos attached to a document or document group, as described above.

These tables of memos can be exported, that is saved as a file to be opened with another program. You can save the table in XLS/X, RTF, or HTML format. Click on one of the Export buttons located in the upper left corner of the dialog box, and choose appropriate the format.

The exported RTF file appears as follows:


Title                        Life strategy and mental health

Document             New YorkVincent

Paragraph            9

Author                    Marissa

Creation date       12.02.2011


Again, this touches on Vincent's life strategy. He is able to maintain “strong mental health” and have a positive attitude even though he realizes he's “an accident waiting for a place.” Again, it seems like his previous life strategy enabled him to successfully deal with the situation.


Is it just Vincent's PMA that enabled him to cope, or is there something more? Other people use religion or a support network (friends, family, etc.) to get through tough situations - is that the same sort of thing going on???


Here you see all the information contained in the memo, such as memo title, creation date, and linked codes as well as the memo text itself. The exported RTF file can be opened in your word processing program to add layout features like headers and footers.

If you choose HTML or XLS/X as the export format, MAXQDA creates a table that is immediately opened in your default web browser such as Internet Explorer or Excel. It is also easy to print out the list in these formats.

Results of a memo export in HTML format
Note: The entire table with all of your memos will be exported unless you have selected some of the memos, which are then marked green. You can select a single menu by clicking on it with your mouse. If you want to select more than one, hold the Ctrl (Windows) or cmd (Mac) button as you click on them. If you want to select a number of memos that are right next to each other in the list, click on the first one, hold Shift, and then click on the last one. All of the memos in between the first and the last will also be included in the selection.
Selected memos are green in the memo table

Was this article helpful?


Managing Memos in the “Overview of memos”

Memos aren’t only accessible from their location next to documents, codes, document segments, etc. They are also available as an “Overview of memos”. You can access these overviews in various ways. An overview of all memos in the entire project can be called up by selecting Analysis > Overview of memos or by clicking on the  symbol in the “MAXQDA standard” toolbar.

In addition, contextual listings of memos in the "Document System" and “Code System” are available. If you select Overview of memos from the context menu of a document group, MAXQDA lists all of the memos assigned to the documents themselves. In the context menu for a code, there is an Overview of linked memos option, which provides a list of all of the memos assigned to the selected code.

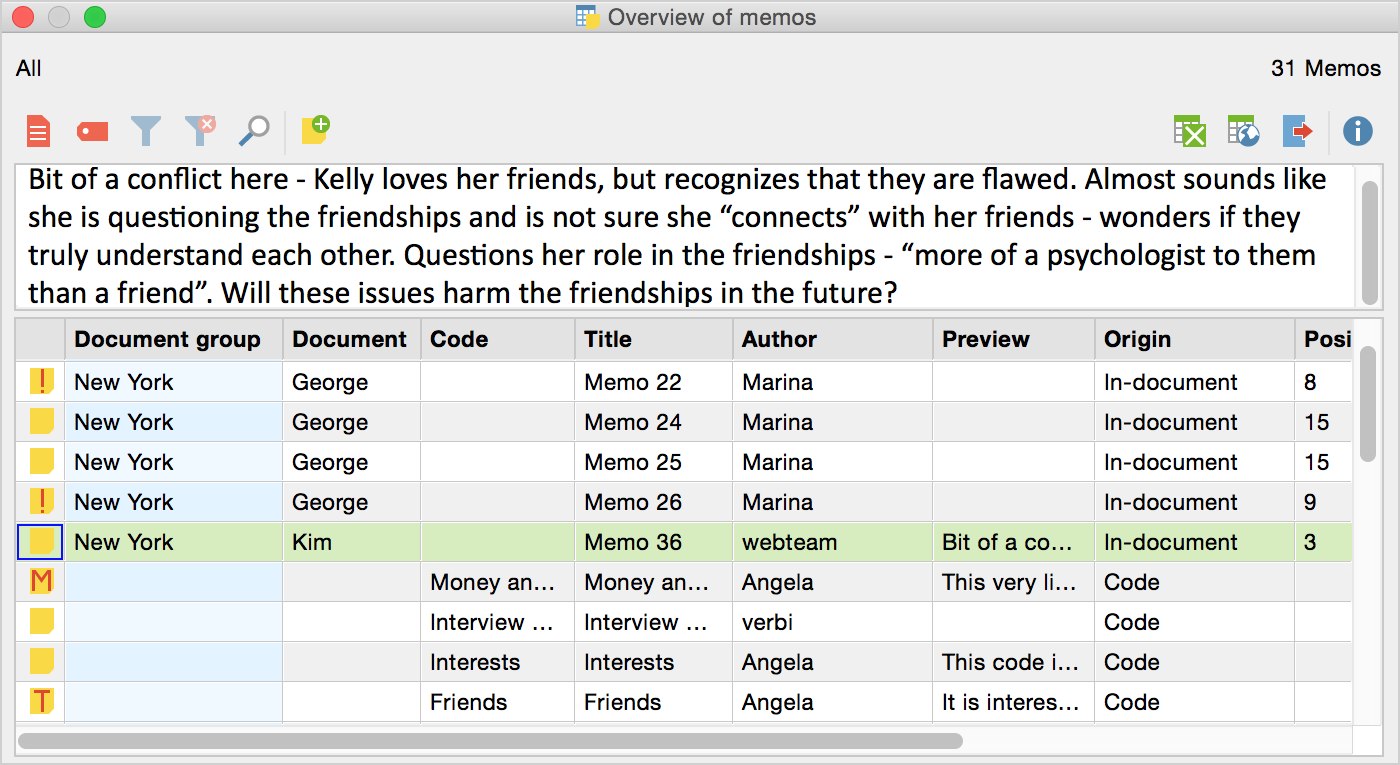
However you open the “Overview of memos,” a table will appear with a list of the requested memos. Each row represents one memo.

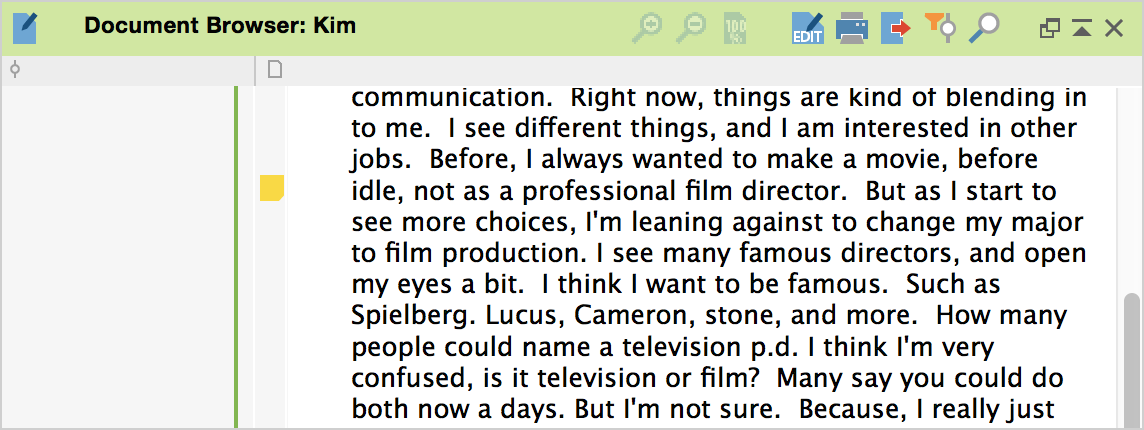
Tip: If you click on the row of a text memo, the text to which the memo is attached will be displayed in the “Document Browser”, and will be positioned at exactly the point where the memo is located. Double-clicking on the row will open the memo for editing.
The “Overview of memos

The columns in the table contain all important information about the memo, including:

  • The name of the document and document group in which the memo is found (or the name of the code in the case of a code memo).
  • For memos attached to document segments, the paragraph number of that segment is listed.
  • The author of the memo.
  • The creation date.
  • A preview of the memo text made up of the first 63 characters
  • The origin of the memo (e.g. the document, document group, document segment, or code the memo is attached to).

The upper section of the window displays the memo text, so that various memos can be scrolled though without opening individual memo windows for each. Memos cannot be modified or deleted in the “Overview of memos”. Instead, right-click on the line where the memo is listed and select Delete Memo.

Note: To modify a memo, double-click on the line where it is located. The usual memo window will open, and from here you can modify or add to the memo text.

Sort Overview of Memos and Customize View

As with all tables in MAXQDA, the table columns can be moved into a different order. Simply click the column header and hold the mouse button as you move the column into the desired position.

Table columns can be hidden by right-clicking the column header and selecting Hide. You can also choose which columns should be included in the table. By right-clicking on any of the column headers, you will have the option to choose Select fields. You can then check the box next to the columns that you wish to view and uncheck the boxes of any columns you want to hide.

The table can be sorted in ascending or descending order, using any column as the sort criterion. To access this function, click the column header. For example, if you click on the “Document Group” column header, the table will be sorted in ascending order of document groups, beginning with A. If you click the column header again, the table will be sorted in descending order of document groups beginning with Z.

The same applies to all data fields: If you click on the “Creation date” column header, the memos will be sorted according to the dates they were created. If you click on the “Author” column header, all memos written by an author will appear in succession.

Filtering the “Overview of Memos”

As with all overviews in MAXQDA, the tabular Overview of Memos can be sorted according to diverse criteria. This is especially handy if you want to compile only the code memos of a project or user, or only the memos that were created after a certain date.

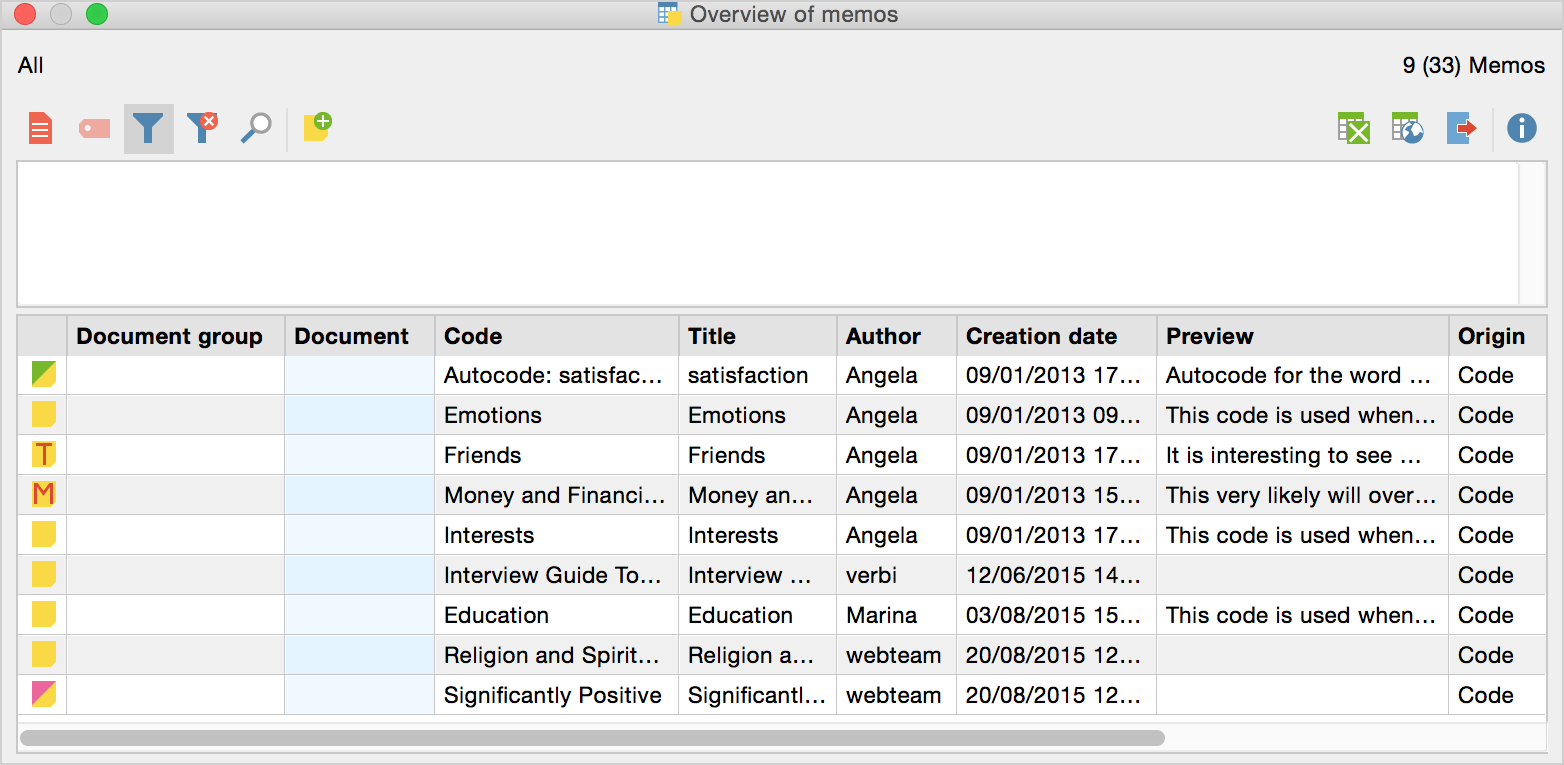
For example, to compile all of the code memos for a project, proceed as follows:

  1. Open the “Overview of memos” with all memos. The fastest way to do so is to click on the  symbol in the standard toolbar.
  2. Right-click on the “Origin” column heading and select Filter.
  3. In the dialog box that appears, select “Contains” and enter “Code”:
Filtering the “Overview of Memos”
  1. When you click OK, MAXQDA will list the code memos of the project only.

Listing of all code memos in a project

Browsing the “Overview of memos”

It is also possible to search in the various columns. To search in a specific column, right-click on the column header and select Search. The instances where the search term appears are immediately highlighted, and the up and down arrows allow you to navigate between memos. To search multiple columns simultaneously, select the Choose search columns option. When you use the magnifying glass symbol  in the “Overview of Memos” toolbar, the search will automatically be carried out in all columns.

Note: When you search the “Preview” column, only the only the first 63 characters of the memo will be included in the search. If you want to search the entire memo text, select the option Analysis > Lexical search.

Creating a New Free Memo

In the "Overview of memos" toolbar you will find the New free memo icon . You can create a new free memo, which is not assigned to any particular document, code, or text by clicking on this icon. Alternatively, you can create a new free memo by selecting Analysis > New free memo from the main menu.

Free Memos are visible in the "Overview of memos" only when all memos from the project are included.

Jumping from the “Overview of memos” to a Memo

From each memo displayed in MAXQDA’s “Overview of Memos”, you can jump to the position in the document that the memo is attached to. You need only click on the desired memo with the left mouse button. The source document immediately appears in the “Document Browser” positioned exactly at the place where the memo is found.

This option only works with memos attached to document segments, of course. If you click on a code memo, the “Document Browser” remains unchanged, but the code is highlighted in the “Code System.” The same happens with memos that are attached to objects in the “Document System.”

Jumping from a memo to its position in a document

Was this article helpful?


Memos Attached to Document Segments

MAXQDA offers several different ways to create a new memo in the "Document Browser":

Creating a Memo by double-clicking in the Memo column

Move the cursor to the memo column, located to the left of the open document, then double-click at the height you wish to attach the memo.

Creating a new memo by double clicking in the memo column

All memos in the document browser are associated with a position on the document. When you create a memo by double-clicking in the memo column, it will automatically be attached to the document body at the level of the click position in the left margin. In MAXQDA, memos can be easily recognized by their yellow icon:

Yellow memo icon in the memo column

Creating Memos using the Context Menu or Quick Button

Other ways to add a new memo are to select the position in the document, right-click with the mouse and select New memo from the context menu, or the Quick button  from the coding toolbar. MAXQDA will insert a memo in the memo column at the selected position in the document.

Tip: In the “Document Browser,” memos can be moved using the mouse – of course, only within the memo column. MAXQDA will display the original position of the memo while it is being moved. The memo’s original position within the document will be cancelled when the move is complete.

The number of memos per document and per position within the document is not subject to practical limitations, which means you can create several memos at the same level in the Document Browser. MAXQDA will automatically place the memos side-by-side.

Note: If you delete text to which a memo is attached while in Edit mode, the memo will be retained and automatically assigned to the preceding text. This operation is intended to prevent valuable personal notes from being deleted unintentionally.

Recording Information in a Memo

Immediately upon creating a new memo, the memo window will appear:

The memo window

You can now enter a title for the memo, so that you can easily find it later in the “Overview of memos”. Select a meaningful title for simple identification.

Tip: The memo title also appears in the tooltip that appears when you hover the mouse over the memo symbol in the “Document Browser.”

The memo text can be entered in the bottom field of the window.

Was this article helpful?


Creating Document Memos in the “Document System”

Memos can also be attached to all items in the “Document System”, including individual documents, document groups, document sets, or the entire project. However, only a single memo can be attached to an item, with the exception of within a document.

There are several options for creating a new memo in the “Document System:”

  • Right-click on a level of the Document system and select the Memo option from the context menu.
  • Alternatively, you can create a memo for the currently selected document or level using the keyboard shortcut Alt+Shift+M.
  • The fastest way is to create a new memo is to double-click in the memo column to the left of the code frequencies.
Creating a memo for a document from the context menu

The memo text field is exactly the same as that of a memo for a text passage, and the author and date will be entered automatically. The memo will automatically assume the document name as its title; this can be changed at any time.

Once created, the memo icon will appear next to the entry in the “Document System” and can be opened and modified by double-clicking on it.

Visualization of a memo in the “Document System”

A memo attached to the top level of the project can be used to retain a description of the entire project. The memos of individual texts can be used to store immediately accessible summaries of these texts. You can see the first few lines of a memo by hovering your mouse over it until a tooltip appears. It is, therefore, a good idea to include the most important aspects of a memo in the first few lines so that they will be displayed immediately when you hover the mouse.

Was this article helpful?


Creating Code Memos in the “Code System”

MAXQDA also allows you to attach memos to codes. These memos often contain category definitions and anchor examples.

There are several options for creating a new memo in the Code System:

  • Right-click on a code and select Memo from the context menu.
  • Alternatively, you can create a memo for the currently selected code using the keyboard shortcut Alt+Shift+M.
  • The fastest way to create a new memo is to double-click in the memo column to the left of the code frequencies.

Example

Let’s say that you wanted to create a memo with a code definition – and later for an anchor example – for the code “Insurance.” You would just need to right-click on the code in the “Code System” and select Code memo. The memo window then appears, where you can customize the memo as per usual.

Creating a code memo

After closing the memo, you will see a yellow memo symbol next to the code in the “Code System”, making it easy to recognize that this code has a memo attached to it.

Tip: For code memos, you will often want to insert an anchor example or explanation of when the code should be used. To insert parts of an open text in a memo, simply highlight the desired text, then drag and drop it into the memo with the left mouse button.

As with other memo types, you can choose another one of the visualization options in the place of the default yellow memo icon. The selected icon will appear next to the code in the “Code System”.

Was this article helpful?