Moving all Coded Segments of a Code

If you move a code from one position in the “Code System” to another, the code references move automatically together with the code. This is like moving a drawer from one place to another in a cabinet; the drawer’s contents move together.

To move a complete drawer is something other than to move only its contents. The same is true with code references. If you only want to move the code references to another code, you cannot use the procedure described above. There is another procedure that leaves the drawer in its place and merely shifts its contents.

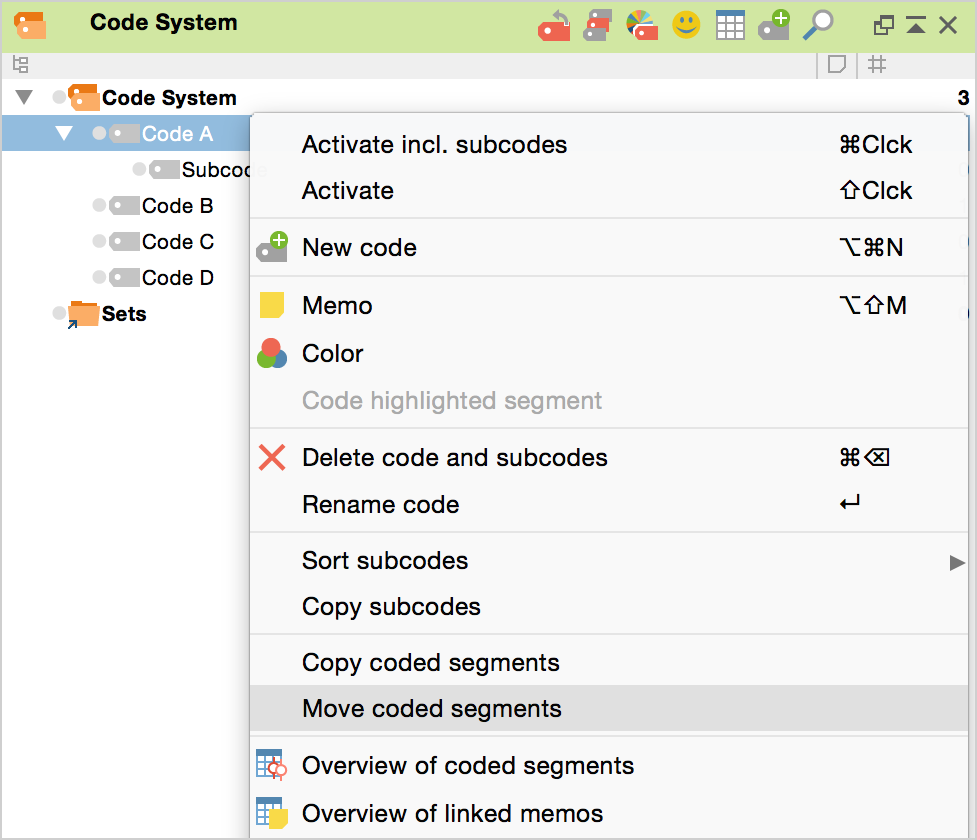
In MAXQDA, it is the Move coded segments option that does this job. This option is available in the context menu of the particular code from which code references are to be moved.

The following figure shows the result of moving coded segments from Code B to Code A. Actually, what takes place is the merging of Code A and Code B:

7-15.png


To move the coded references from Code B to Code A, follow these steps:

  1. Right-click on Code B in the “Code System.”
  2. Select Move coded segments. This transfers the code references to an internal clipboard. (Up to this point, nothing has really changed in the “Code System.” The number of coded segments displayed to the right of Code B is still the same.)
  3. Right-click on Code A (the target code) and choose Move coded segments from ‘Code B.’ MAXQDA asks you to confirm the command before executing it.
Moving coded segments

Code B remains in the “Code System” until you delete it, but the number of its immediate code references is now zero. The contents of the “drawer” have been moved to Code A.

The subcodes’ references, however, will not have been moved. Be careful when deleting Code B now, since all subcodes – if there are any – will be deleted too, along with their code references.

It is of course possible that some segments that you move from "Code B" to the target code "Code A" have already been coded with the target code. MAXQDA will handle these overlapping codes as follows.

  • The segment boundaries of the existing coded segments will be adapted to those of the moved coded segments.
  • If both coded segments have a comment, those of the target code will be retained. The comments of the moved coded segments will be deleted.
  • If only one of the coded segments has a comment, it will be retained.
  • Because of overlapping codes, the number of coded segments in the target code may be lesser after they are moved. If you move 10 coded segments of "Code B" to "Code A" with 20 encodings and multiple overlap, fewer than 30 encodings will be displayed in "Code A".
Tip: If you want to delete all code assignments but want to keep the code in the “Code System,” it is best to create a code named “trash” and then copy the code references to the “trash.”

Was this article helpful?


Copying all Coded Segments of a Code

The function “Copy coded segments” is similar to the “Moving all coded segments of a code” function. The important difference is that the original code assignment will be retained; that is to say, the coded segment will be duplicated and assigned to a new code in addition to the original code.

This action is performed as follows:

  1. Right-click on the selected code in the “Code System”.
  2. Select Copy coded segments from the context menu that appears.
  3. Move the cursor to the target code to which you want to copy the coding added and click on it with the right mouse button.
  4. Select Insert coded segments from xx from the context menu that appears

It is of course possible that some segments that you copy from "Code B" to the target code "Code A" have already been coded with the target code. MAXQDA will handle these overlapping codes as follows.

  • The segment boundaries of the existing coded segments will be adapted to those of the moved coded segments.
  • If both coded segments have a comment, those of the target code will be retained. The comments of the moved coded segments will be deleted.
  • If only one of the coded segments has a comment, it will be retained.
  • Because of overlapping codes, the number of coded segments in the target code may be lesser after they are moved. If you copy 10 coded segments of "Code B" to "Code A" with 20 encodings and multiple overlap, fewer than 30 encodings will be displayed in "Code A".

Was this article helpful?


Deleting Coded Segments: The Undo Function

Clicking on the code symbol with the right mouse button causes a context menu to appear, with which the coding of the text segment can be removed. Choose Delete and confirm the deletion by clicking Yes in the confirmation window that appears.

If you need to first find the location of a coded segment in a document, deleting the code in this way may not be very convenient. A better way is to use MAXQDA’s Undo function. In the “Code” toolbar on top of the “Document Browser” window there is an Undo  button. Clicking on it opens a list containing the last codes assigned.

Undo function in the “Code” toolbar
Note: The Undo function does not work when you have moved coded segments.

The most recent coded segments are shown at the top of the list.

Codes can also be cleared through the “Retrieved Segments” window: Right-click on the information box and select Delete in order to delete the selected code.

Note: If a code is deleted from the Code System, the code is removed from all segments that were coded with that code.

Was this article helpful?


Modifying Coded Segments

There are various ways to modify coded segments:

  1. By assigning a new code.
  2. By assigning another code in the place of an existing code.
  3. By modifying the segment boundaries, meaning enlarging or reducing the coded segment while the code remains in place.

All three of these modifications can be easily carried out in MAXQDA.

Coding a Segment With More Than One Code

After having coded a segment, the segment remains selected (with the exception of highlight-coded segments). It is possible to attach more codes to the same segment, for example using drag & drop.

If you want to assign one or more codes later, the segment must be selected again. This is easiest if you click on the coding stripe of this segment with the left mouse button. The segment will be highlighted again as in the original text, and you can assign a code in the usual way, either with Drag & Drop, by right-clicking on the desired new code in the "Code System" and selecting Code highlighted segment, with the Code quick button, as well as other MAXQDA coding options.

Another option is to highlight the document segment, activate the codes you want to code it with, and then right-clicking on one of the codes and choosing Code with selection. The segment will then be coded with all activated codes at once.

Replacing a Coded Segment

When reviewing your text analysis, you may decide that the wrong code was assigned to a text segment. Or you may decide that the “Code System” is not precise enough, so it is necessary to expand the “Code System” and distinguish between different codes. In both cases, you will need to replace one code assigned to a text with another.

This can be easily accomplished, as long as the coded segment is displayed in the “Retrieved segments” window:

  1. Click on the source data next to the segment
  2. Drag the segment to the desired code.
  3. The new code will automatically be assigned to the coded segment. If the other code is not activated, it may be that the coded segment was removed from the “Retrieved segments” window.
  4. A coded segment can be moved from the table view or the “Overview of coded segments” in the same manner.

Editing the Size of a Coded Segment

Sometimes a segment may be coded outside of its logical boundaries, meaning it is too short or too long. The coded segment will therefore be difficult to understand because it is out of context. Segment boundaries can be adjusted in the following way:

  1. Select the segment by clicking on the corresponding coding stripe or code name in the “Document Browser”. The segment is now highlighted in the original text.
  2. The segment boundaries can now be redefined as usual using the mouse. Alternatively, you can right-click the coding stripe and select Recode with highlighted segment.

MAXQDA automatically adjusts to the newly defined segment boundaries.

Note: Existing coded image segments in image or PDF docments will only be adjusted when the newly selected area either completely includes the existing segment or when the newly selected area is completely inside the area of the existing coded segment.
Changing the size of the coded segment

While the function “Recode” moves the segment borders of a coded passage to the highlighted segmemt you can also extend the borders of an existing coded segment:

  1. Highlight a passage that overlaps with the beginning or the end of an existing segment.
  2. Right click on the coding stripe and choose the entry Extend with highlighted segment.

Was this article helpful?


Creating Comments for Coded Segments

You have the option of creating a short comment (maximum of 127 characters) for each of your coded segments. This might be an overview of the coded segment or a comment about its significance for your analysis. These comments are then shown in the tooltip that appears when you hover the mouse over a coding stripe.

To create a comment for a coded segment, follow these steps:

  • In the “Document Browser”: Double-click on a coding stripe or on a code name.
  • In the “Retrieved Segments” window: Double-click on the source data of a coded segment
  • In the “Overview of coded segments” or the table view of “Retrieved Segments”: Double-click in the “Comment” column to add a comment directly in the table.

You can easily see if a comment has been written for a coded segment when you look at the code symbol. Normally the inner part of the little circle is white in color, independent of the color of the code symbol. When a comment is attached, the inner circle appears in the same color as the outer line of the symbol.

A coded segment comment shown in the tooltip when hovering over the circle in the middle of a coding stripe
Finding your Coded Segment Comments

As long as you haven’t changed the standard view, you can find all of your code comments in the “Overview of coded segments” table in the second column. You can also insert new comments and delete/change old ones from this view. By right-clicking on the column header, you will have the option of clicking on the Search function. You can then start typing the first word in the comment you are looking for. If you want to search for a word that appears somewhere in the comment, not necessarily at the beginning, you can simply start the search string with the “*” symbol.

Was this article helpful?