The Multimedia Browser Window
Using the Multimedia Browser you can easily play and code audio and video files. To open the Multimedia Browser, click the Multimedia Browser icon ![]() on the “Media player” toolbar. To do this, the Media Player has to be turned on by clicking the
on the “Media player” toolbar. To do this, the Media Player has to be turned on by clicking the ![]() icon (you can only do this when a document with a media file assigned to it is displayed in the “Document Browser”).
icon (you can only do this when a document with a media file assigned to it is displayed in the “Document Browser”).
The following screenshot shows the structure of the Multimedia Browser:

For video files, the Multimedia Browser consists of five panels:
- The upper panel shows the video.
- Underneath, there is a toolbar containing the functions to adjust the view and playback and the functions for coding. Here, you can also see the current playback position and the total time of the media file.
- Beneath the toolbar, preview pictures are shown.
- Underneath, you can see the waveform of sound of the media file, and below this, there is a time line where you can see the current playback position precise to the second.
- Under the time line there is a bar for the timestamps of the transcripts.
- At the very bottom is an area where the coded segments are visualized by bars.
For audio files, the video window and preview pictures are not shown.
The blue vertical line and the blue bar underneath the time line indicate the current playback position.
The following functions are available on the toolbar:
![]() Control Panel – opens the window with playback options
Control Panel – opens the window with playback options
![]() Copy video image to the clipboard – saves a screenshot of the current video image in the clipboard, which can then be pasted, for example, directly in a Word file.
Copy video image to the clipboard – saves a screenshot of the current video image in the clipboard, which can then be pasted, for example, directly in a Word file.
![]() Insert video picture as an image in ‘Document System’ – the currently displayed video image is inserted as a new document in the Document System, in order to, for example, code image segments.
Insert video picture as an image in ‘Document System’ – the currently displayed video image is inserted as a new document in the Document System, in order to, for example, code image segments.
![]() New memo – creates a new memo in the current playback position
New memo – creates a new memo in the current playback position
![]() Set clip start – sets the beginning of a clip segment at the current playback position
Set clip start – sets the beginning of a clip segment at the current playback position
![]() Set clip end – sets the end of a clip segment at the current playback position
Set clip end – sets the end of a clip segment at the current playback position
![]() Play clip – plays the segment selected on the waveform
Play clip – plays the segment selected on the waveform
![]() Remove clip – removes current clip marks from the waveform
Remove clip – removes current clip marks from the waveform
![]() Go to beginning – jumps back to the beginning
Go to beginning – jumps back to the beginning
![]() Previous timestamp – rewinds the media file to the previous timestamp.
Previous timestamp – rewinds the media file to the previous timestamp.
![]() Stop – stops playback and jumps back to the beginning
Stop – stops playback and jumps back to the beginning
![]() Play/Pause – starts/pauses playback
Play/Pause – starts/pauses playback
![]() Next timestamp – fast forwards the media file to the next timestamp.
Next timestamp – fast forwards the media file to the next timestamp.
![]() Go to end – jumps to the end
Go to end – jumps to the end
![]() Slider – helps you jump to a certain position
Slider – helps you jump to a certain position
On the far right of the waveform, there are other icons that you can use to adjust the zoom for the waveform and for the preview pictures of videos. The icons are hidden in order to not cover the waveform. They appear as soon as you move the cursor over this area.
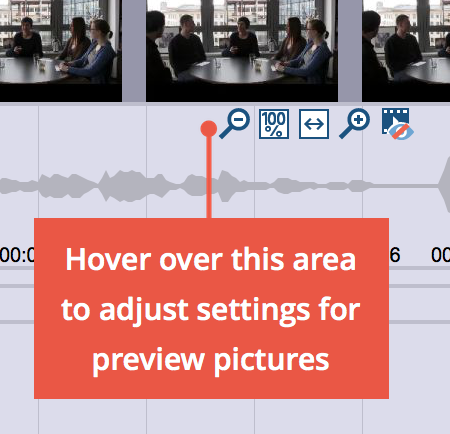
![]() zooms out of the waveform, reduces the number of preview pictures for videos.
zooms out of the waveform, reduces the number of preview pictures for videos.
![]() zooms the view to 100%. This view is configured by default and is usually ideal for coding.
zooms the view to 100%. This view is configured by default and is usually ideal for coding.
![]() shows the complete media file in the Multimedia Browser; this gives you an overview of the waveform of the complete file. This view is usually not suitable for coding.
shows the complete media file in the Multimedia Browser; this gives you an overview of the waveform of the complete file. This view is usually not suitable for coding.
![]() zooms into the waveform, increases the number of preview pictures for videos. This makes it easier to navigate to single pictures and words.
zooms into the waveform, increases the number of preview pictures for videos. This makes it easier to navigate to single pictures and words.
![]() hides the preview pictures bar.
hides the preview pictures bar.
Coding in the Multimedia Browser
You can code audio and video files in the same way as texts in MAXQDA. You start by marking a segment of the waveform (a so called “clip”). Typically, you will want to set the beginning and end of a segment in a media file precisely to the split second as the scene and content can change completely from one moment to the other. For this reason, MAXQDA offers a number of functions that allow you to mark an audio or video clip:
- To roughly mark a segment, keep the left mouse button pressed and select the segment by dragging the cursor over the waveform. The time limits are displayed underneath the beginning and end marks.
- You can easily alter the time limits of the clip by moving the whole blue-marked segment or by clicking and dragging the outer borders of the segment in the waveform.
- By using the right and left arrow keys, playback is moved by one tenth of a second. If the playback precisely matches the beginning or end of a clip, the clip is enlarged or reduced accordingly.
- To play the marked clip, click the icon Play clip or press the F9 key.

- You will usually play a media file and then pause exactly at a position where you want to set a new coding. To do this, use the button Play/Pause
 or the F4 key.
 - When the playhead is at the designated position, click the button Set clip start or press the F9 key.
- Now resume playback and pause at the position where you want to end the coding. Click the button Set clip end or press the F10 key.

You can now code the selected segments as usual, for example by (a) dragging and dropping the marks on to a code, (b) clicking on an emoticode, or (c) by clicking a color code. Right-clicking on a marked segment opens a context menu that contains three options that are relevant for coding:

When coding is completed, it will be indicated by a horizontal coding stripe in the Multimedia Browser. Below it, on the left, the code name is displayed. The coding will also be indicated by the color of the waveform (green for standard codes, other colors for color codes). If various codes are layered on top of each other, the color of the waveform is a mix of the colors. Segments coded with an emoticode are indicated by the Emoticon next to the coding stripe.
Clicking on a coding stripe selects the coded segment on the waveform. Double-clicking plays the clip.

Right-clicking on a coding stripe opens a context menu containing the usual options:
- Modify weight
- Edit comment
- Delete
Coded segments that have a comment are marked with a white square on the left hand side of the coding stripe.
Audio and Video Clips in the “Retrieved Segments”
In the “Retrieved Segments” window, video clips are shown using the first picture of the video clip. For audio clips, a picture of a waveform is shown.
The time indication tells you when an audio or video clip starts and ends.

Attaching Memos to Audio and Video Clips
You can attach memos for notes to any playback position. To attach a new memo,
- Right-click a position of the waveform
- Or click the button New memo
 in the Multimedia Browser toolbar.
