Whether you’re a first-time researcher or an old pro, MAXQDA is your professional software solution with advanced transcription tools for you and your team.
Transcription is an important step in the data analysis journey of many research projects, but it can often become a time-consuming and arduous affair. Transcribe with MAXQDA! Our product comes with many exciting features which make the transcription process faster and easier than ever before.
All-in-one: transcribe quickly and analyze intuitively

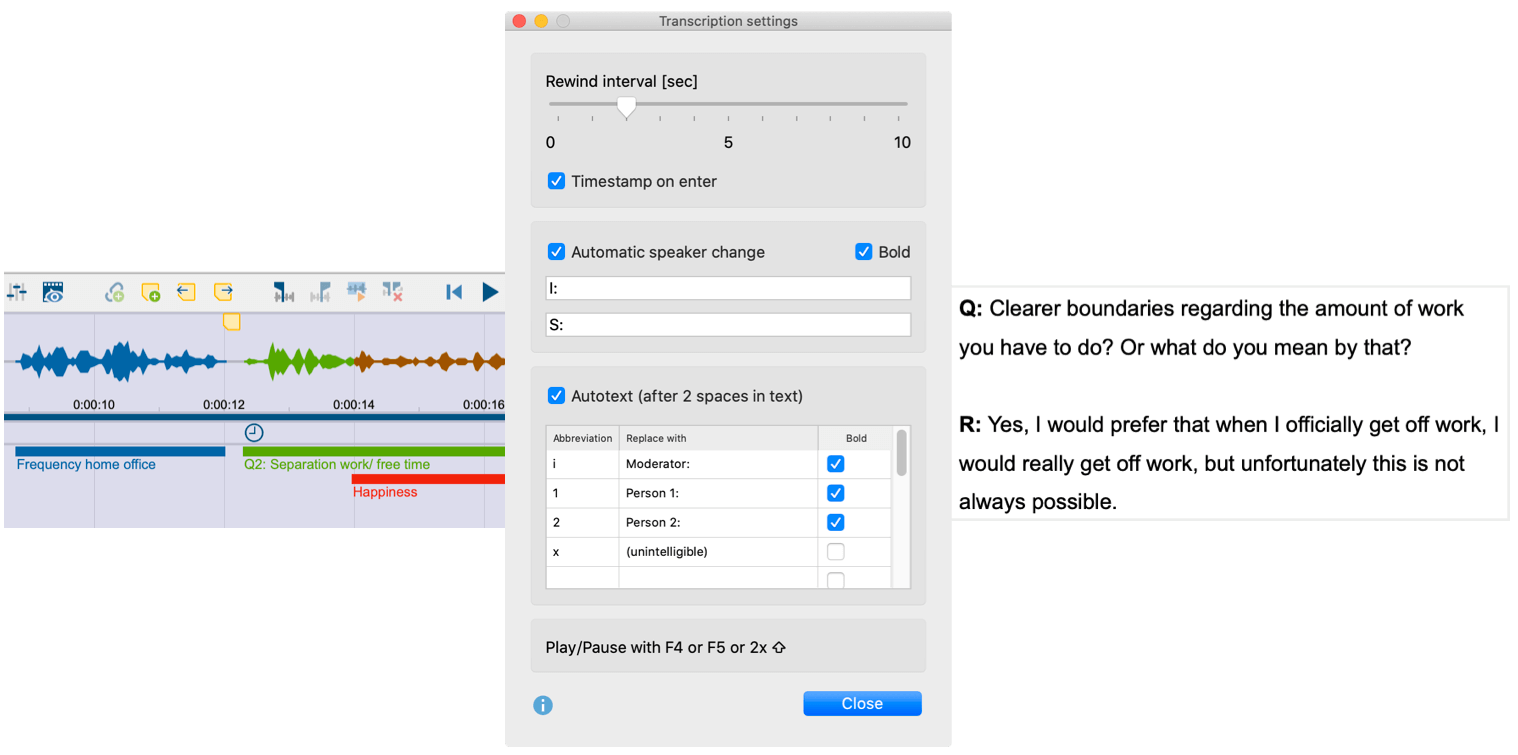
MAXQDA makes transcribing research data a snap with a focused transcription view and automatic label changes for speakers whenever you start a new paragraph. You can also define your own shorthand symbols for words and phrases, e.g. where “1” changes to “Person 1” or “x” to “(incomprehensible)”. It’s fun and saves a lot of time!
Let’s get started: Transcription Mode
Whether you saved your data on your smartphone, used an old-school dictation machine to record interview audio, or made video recordings of your focus group discussions, MAXQDA is here to help you get it down on (virtual) paper.
When you import your audio and/or video files into MAXQDA, an empty text document will automatically be added to the “Document System” and assigned to your file. This is where you can write your transcript.
To activate Transcription Mode, simply right click on the document and select the option “Transcribe audio file” or “Transcribe video file”. The “Multimedia Browser”, “Document Browser”, and a settings dialog window will pop up. Next, arrange the windows however you like – there are no rules, make it your own and get comfortable.
If you need a break, don’t worry, you can start and stop Transcription Mode at any time – just close the Multimedia Browser. After a cup of coffee and a breather, simply resume working on a transcript with a right click on the document and then select Transcribe audio file or Transcribe video file.
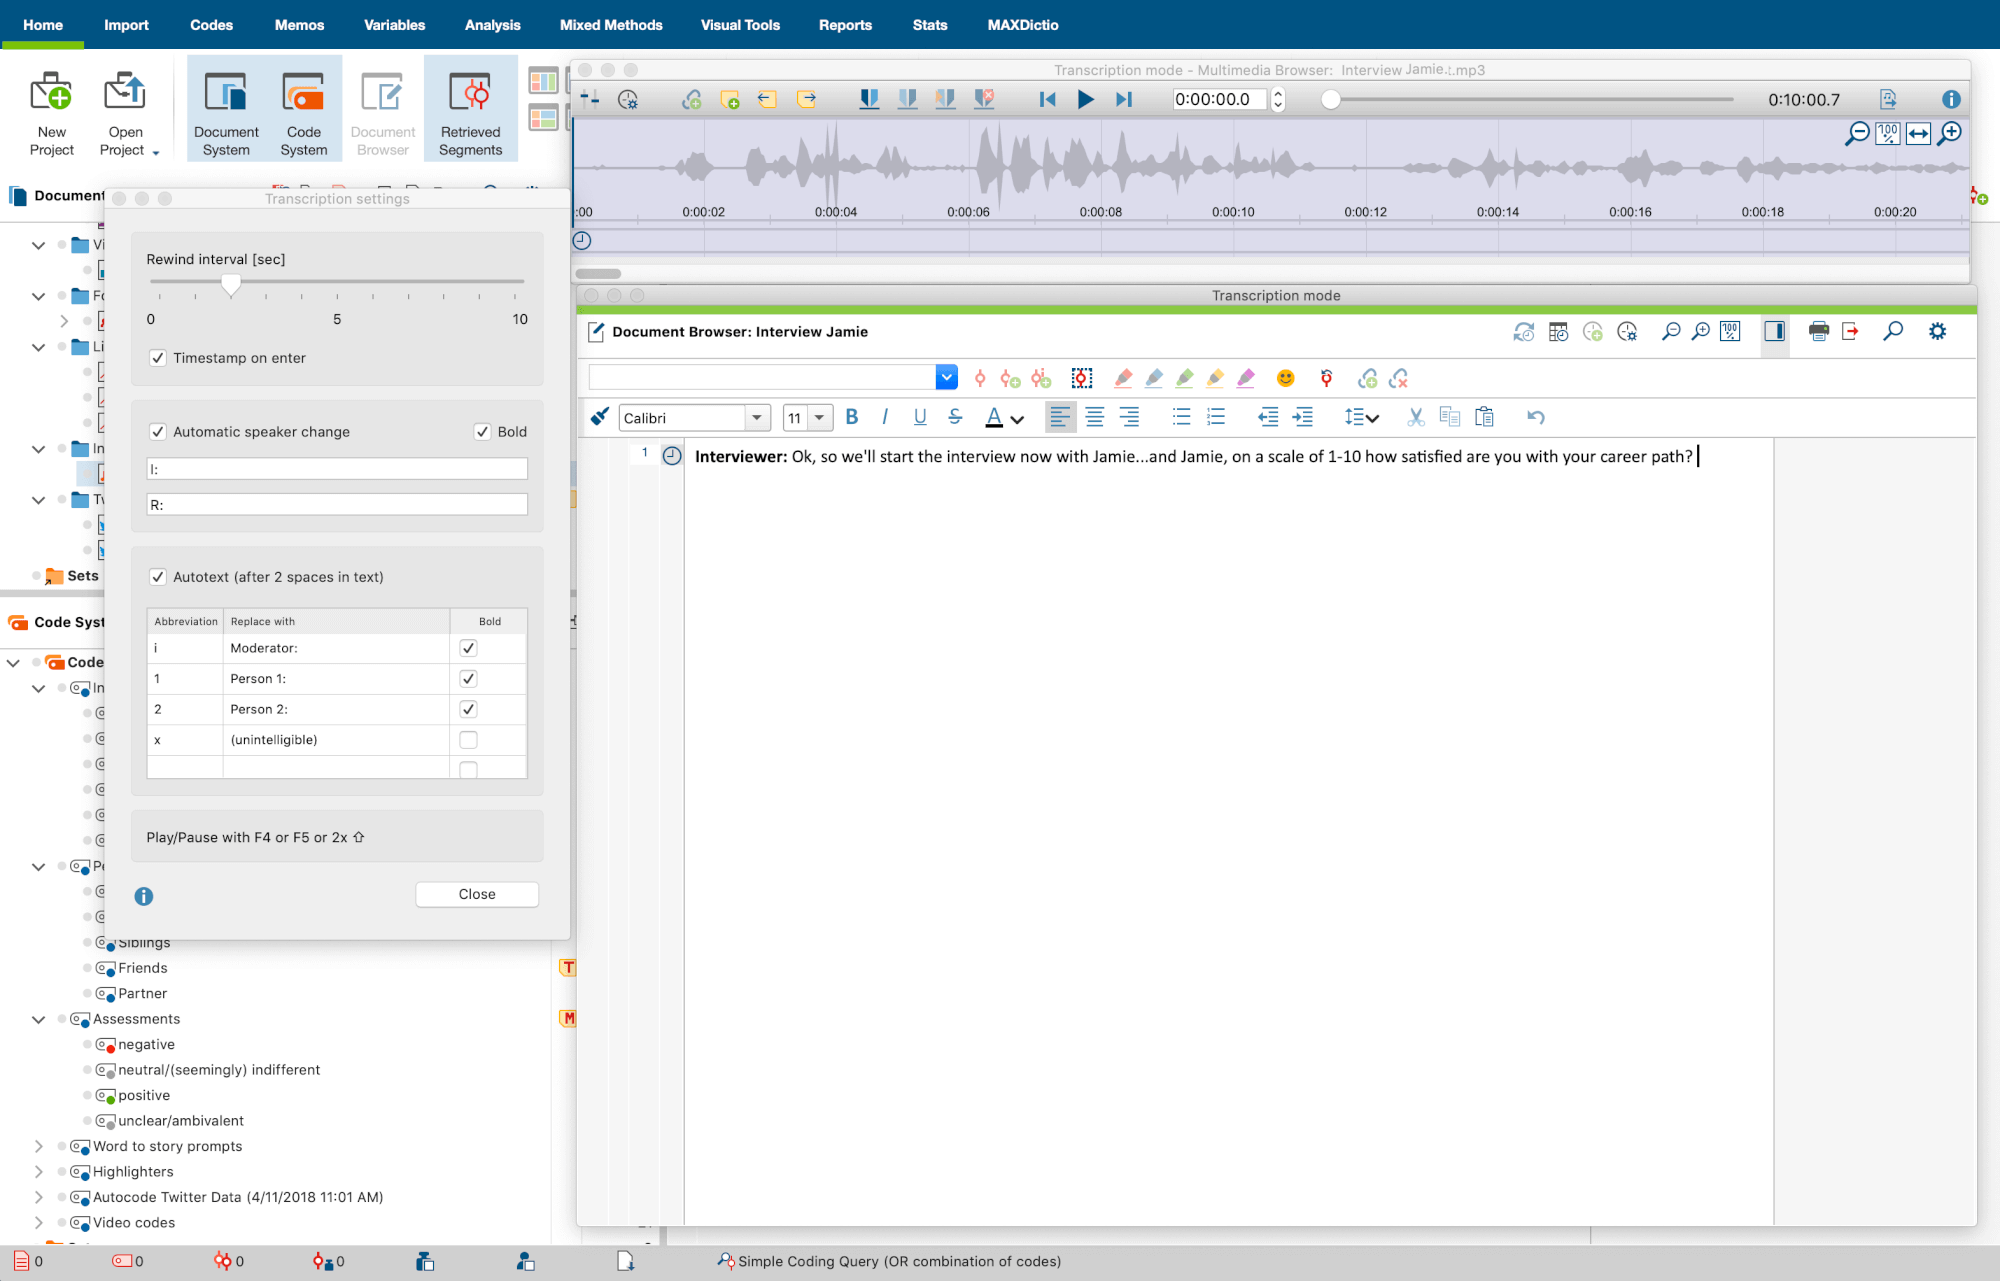 Setting options for transcription.
What’s your preference? Choose your settings
Now you can play the recording and start writing. To play and pause,
- Press F4 or F5,
- or press Ctrl (Windows) or Shift ⇧ (Mac) twice in succession, then you don’t have to move your fingers very far,
- or use the play and pause icon in the “Multimedia Browser”.
To quickly navigate to a certain spot in your audio file, use the slide control in the “Multimedia Browser” window – or use the keyboard combination F11 and ⇧+F11 to rewind or forward 5 seconds. You can also adjust your rewind intervals, volume, and playback speed by clicking the gear or Control Panel icons at the top right of your MAXQDA window. When you are satisfied with your settings, just close the window to save screen space.
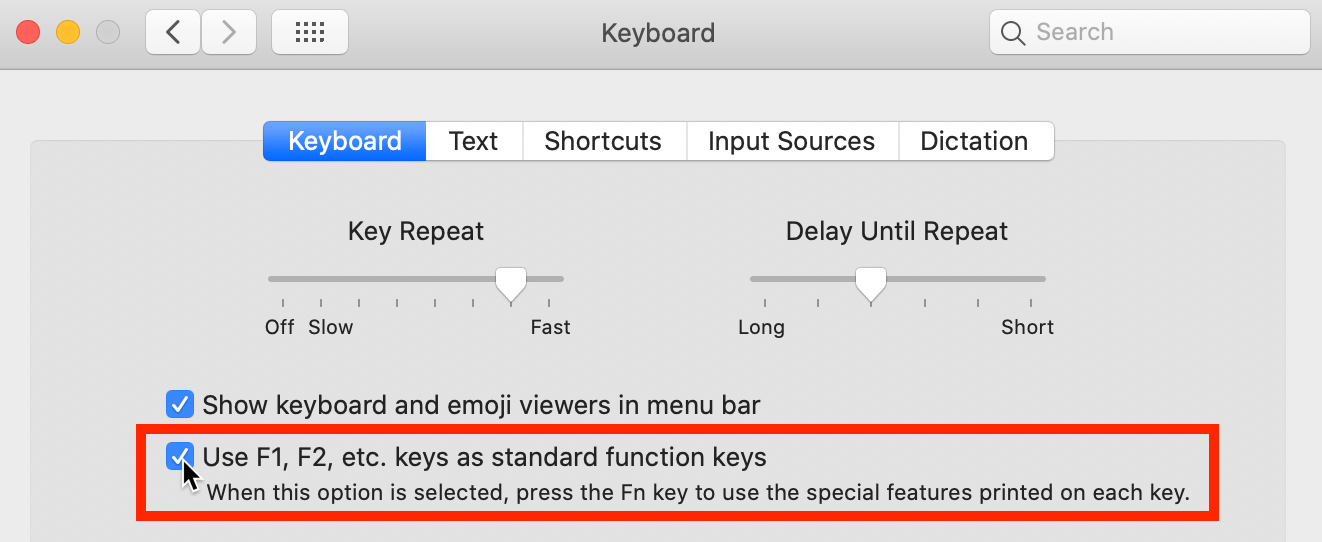
Tip: If you are using a Mac, the F4 key is usually used for system features, like opening up the launchpad application or changing the brightness of the screen. If you want to use F4 to play and pause audio in MAXQDA for Mac, you can find an option to do so in “System Preferences > Keyboard”.
Open “Keyboard” and activate the option “Use all F1, F2, etc. keys as standard functions keys”.
Make it automatic: Auto speaker change and autotext
Sometimes the simplest road is the easiest road. Why write out the same names and words over and over again when MAXQDA can do it for you? Simplify your transcription work with the help of these two functions:
Automatic Speaker Change
When transcribing a recording with two speakers, you can switch on the automatic speaker change in the transcription settings. As a result, each new paragraph begins automatically with a freely definable name, pseudonym or abbreviation.
Follow these steps:
- Select the option Automatic speaker change in the “Transcription Settings” dialog window.
- Enter names for each speaker. It’s a good idea to add a space on the end too.
- Select the Bold option if you want to want to emphasize one name.
Autotext
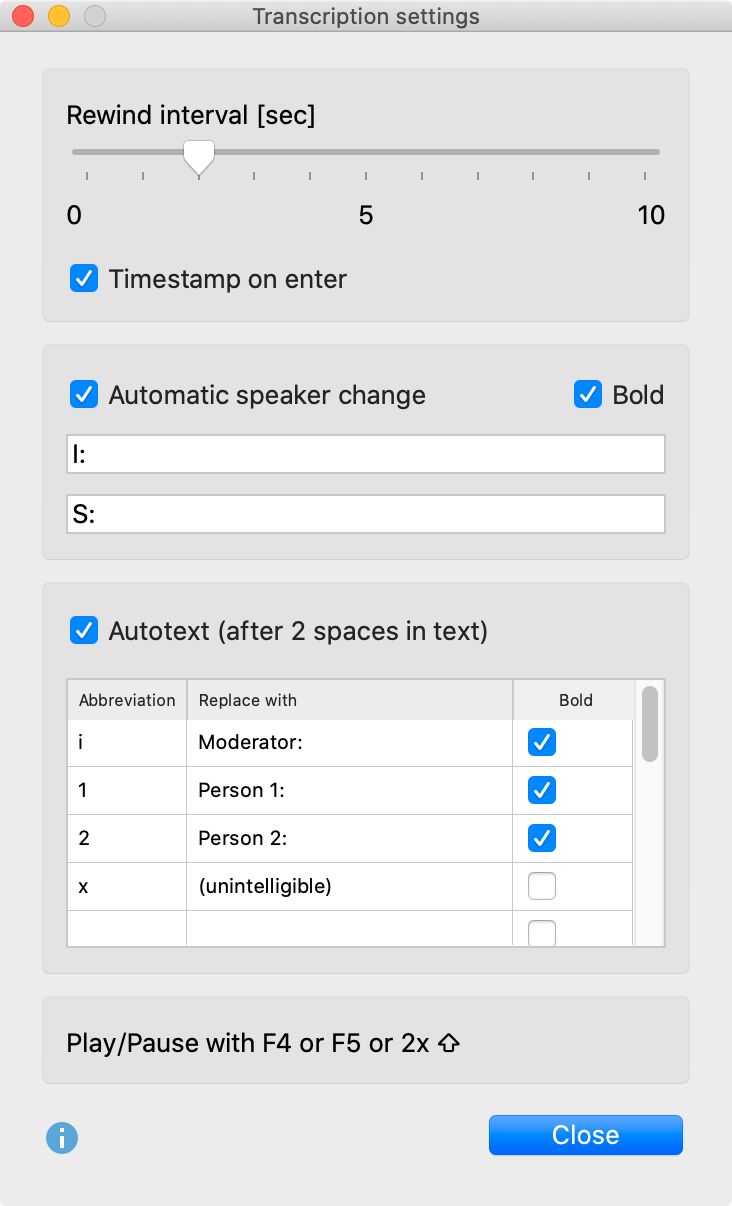
Focus group discussion enthusiasts take note: there is an easier way! In “Transcription Settings” you can also define abbreviations, which are automatically replaced by text when two spaces are entered. This is particularly useful when transcribing a group discussion with several speakers, because then the names of the participants can be added via shortcuts, saving you a lot of typing. Likewise, you can also set frequently recurring and difficult-to-type transcription elements with brackets, e.g. “(Incomprehensible)” or “(2)” for 2 seconds as autotexts.
The following picture shows the default autotexts set for all new MAXQDA projects.
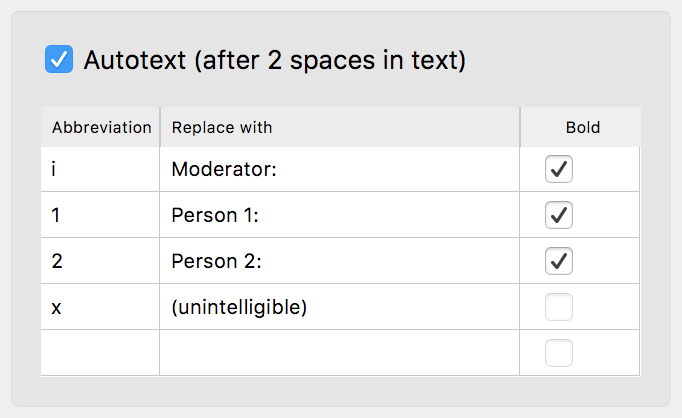 Setting autotext abbreviations.
The autotexts are stored in your project, which means you can use MAXQDA on different computers to transcribe without having to reenter them. This is also helpful for researchers working in teams.
You can create a total of 15 autotexts, allowing you to be as creative as you like and personalize your process to best fit your needs. You can also switch off the autotext function entirely by deactivating this option in “Transcription settings”.
Never lose your place again: timestamps linked to sound
As we all know, when conducting fieldwork there are times when the audio is not clear. There may be background noise, for example, or your interviewee is difficult to understand in certain sections. With timestamps, you can link your transcript to the original recording so that you can always access the original sound. This is especially helpful when you need to replay a section just one more time to make sure that it is correct.
By default, MAXQDA automatically enters a timestamp at each end of a transcribed paragraph, which is usually at the end of a speaker’s contribution. The timestamps appear in a separate column in the “Document Browser”.
 Timestamps in the document browser.
Clicking on a timestamp (or the range between two timestamps) opens the associated media file and starts playback at the stored position. Playback automatically ends at the next timestamp.
Automatic timestamp addition can be adjusted in the “Transcription settings” window. If the window is hidden, you can open it by clicking on the Transcription settings icon on the left side of the “Multimedia Browser”.
Any questions?
For step-by-step instructions on how to transcribe audio and video files with MAXQDA, please see our user manual, check out our online video tutorials, or feel free to contact our Customer Service Team. Research is a journey, travel it well!
Editor’s note: this post has been updated from its original version published in January 2018.

